Scoring shouldn’t feel intimidating. Today I’m teaching you the easy way to make 10 Simple Sourdough Scoring Designs that are perfect for beginners. Each will make a beautiful loaf without making you crazy!
I’ve included before-and-after photos so you can see exactly how simple cuts in cold dough turn into a stunning, golden-brown masterpiece. I will also cover the basic scoring training that I wish somebody had given me before I attacked my first loaves.

New to sourdough? Start Here! How To Feed Sourdough Starter Beginners Guide Easy Sourdough Bread Recipe for Beginners (Artisan Loaf)
How to Score Sourdough Bread
Scoring is more than just making your bread look beautiful. It is actually a vital step in the baking process. When your dough hits the hot oven, the gases inside expand rapidly. This is called “oven spring.” If you don’t provide a designated “escape route” by cutting the surface of the dough, the bread will burst at its weakest point, often resulting in lopsided loaves or “blowouts.”
What I Wish I Knew Before My First Score – 3 Crucial Tips!
If I could go back and give myself a “cheat sheet” when I first started, these are the three rules I’d follow. Learning these would have saved me a lot of guesswork and Frankenstein looking loaves. (A friendly note – crazy looking bread still tastes like amazing homemade bread so don’t stress!)
Depth is Your Friend: Beginners often score too shallow. Expansion cuts (like a Cross or Slit) need to be about 1/2 inch deep. Decorative scores (like stalks of wheat) should just barely nick the surface. I used to worry about going too deep and ruining my bread. But, if you just nick the surface, the bread will find its own way out—usually by bursting at the bottom like a gorilla on a rampage!
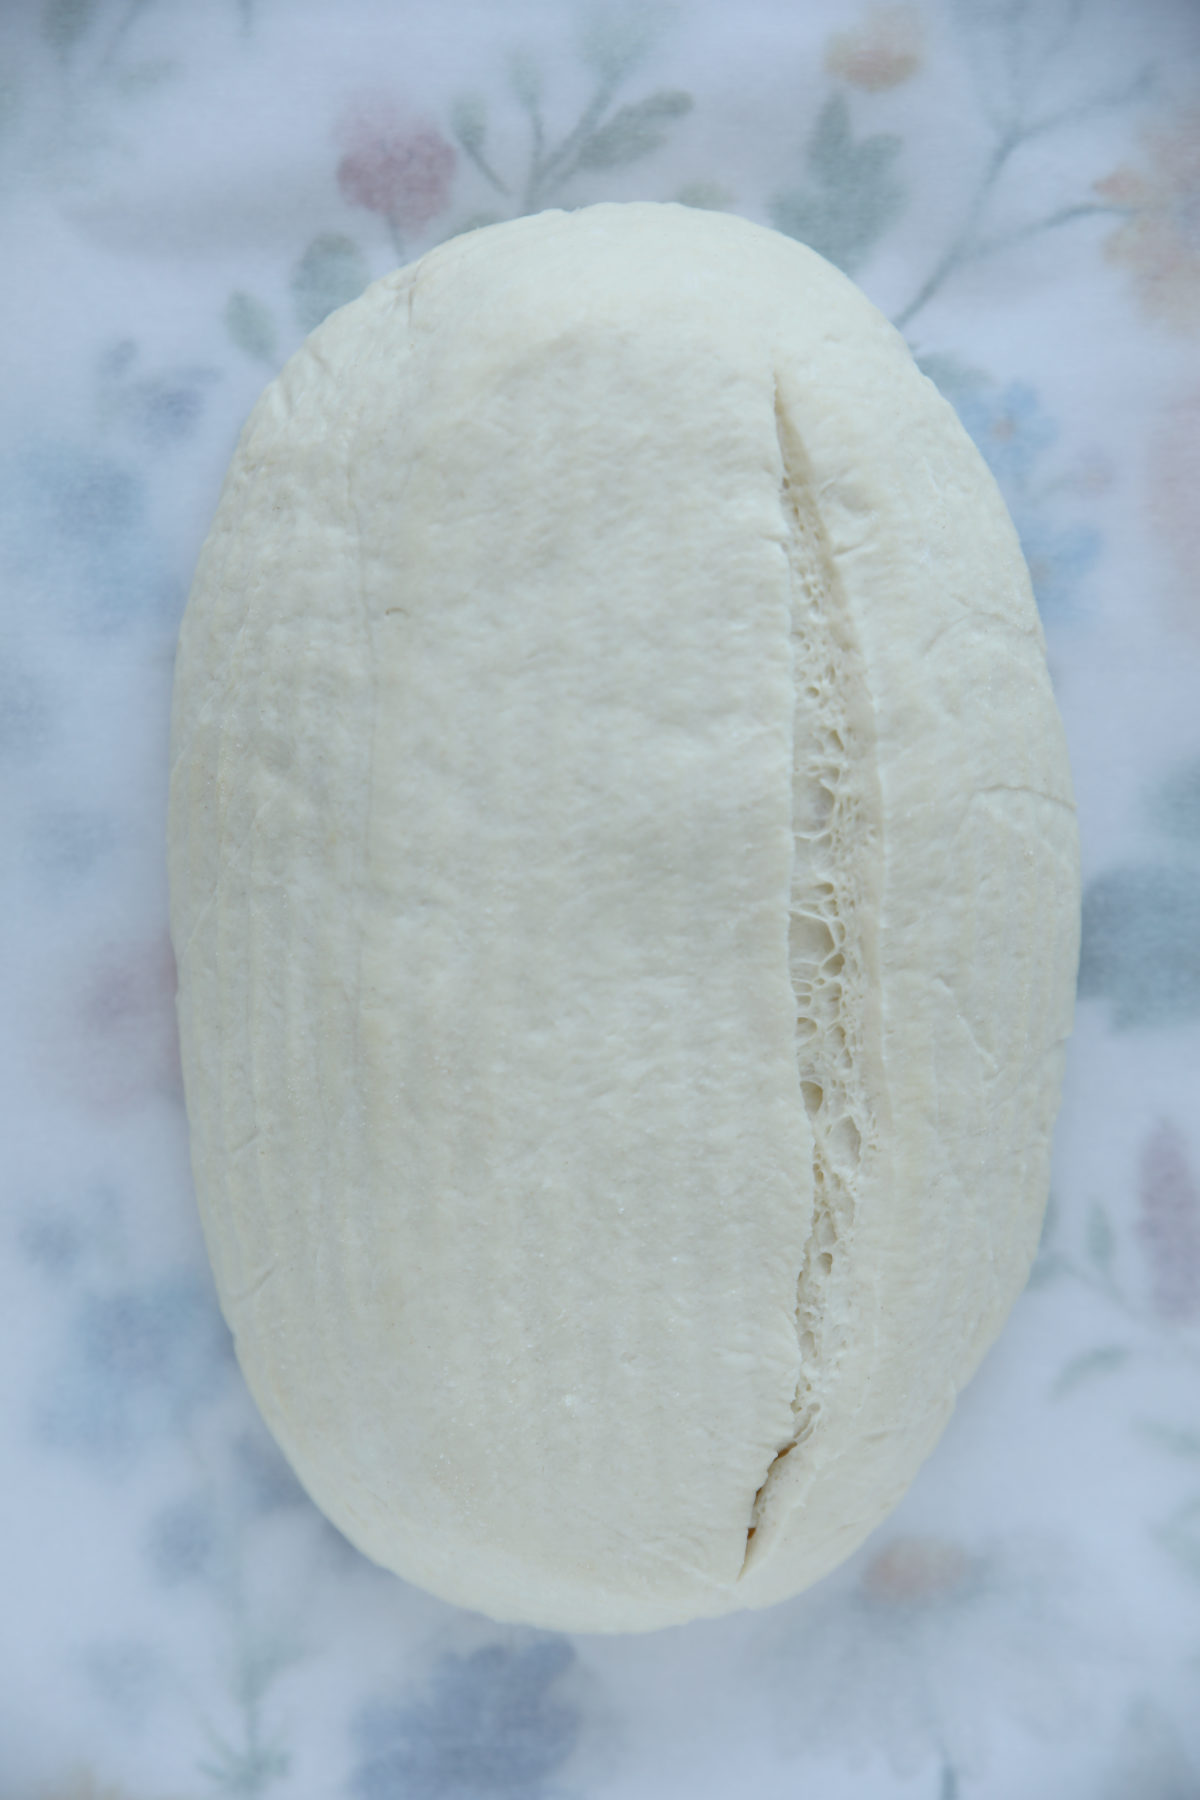
The “Cold Bake” is a Cheat Code: Scoring room-temperature dough is like trying to slice a balloon with a butter knife. It’s floppy and sticky and you will want to phone a therapist when you are done. Scoring a cold loaf straight from the fridge is 100% easier. The skin is firm, the blade glides, and your designs stay crisp.
The “Hand-Tension” Trick: This was my biggest game-changer. Don’t just swipe at the dough and hope for the best. Use the hand that isn’t cutting to gently pull the surface of the loaf taut as you score. Holding that tension ensures the blade slices through the skin instead of dragging or “shagging” the dough.
Functional vs. Decorative Scores
Understanding the difference between a functional score and a decorative score is the key to a successful bake. Translation – getting the loaf to do what you want it to.
- Expansion Scores: These are the “heavy lifting” cuts. They are deep enough to allow the bread to grow without tearing.
- Decorative Scores: This is the art part you can do if you want. These must be shallow so they don’t interfere with the main expansion.
- Combining Both: Most successful sourdough scoring designs use one deep functional cut paired with several shallow decorative ones.
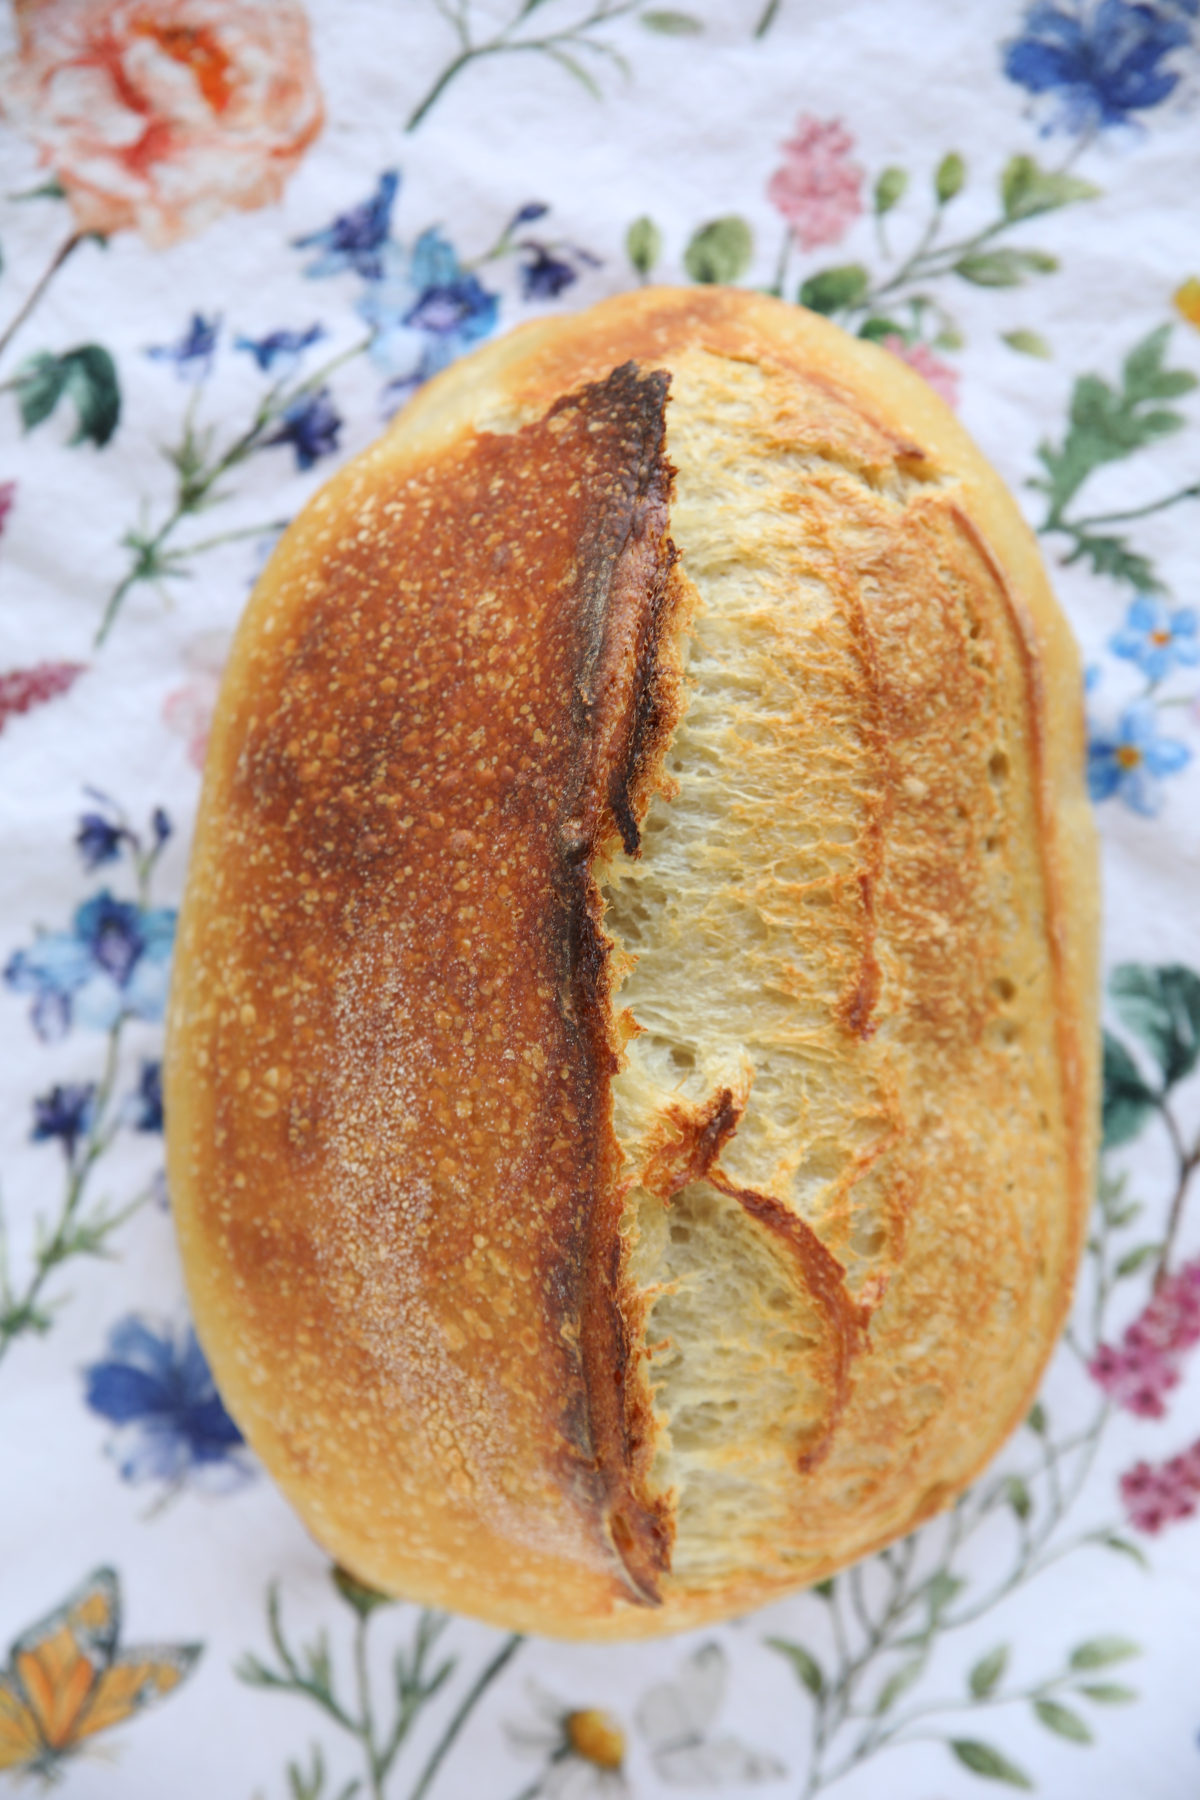
Do you see the jagged edges of the score? This bread was scored with a dull lame and it caught and tore the dough. When your lame starts catching, rotate or change the blade.
Four Keys About Using a Bread Lame
Learning how to use a bread lame (a specialized razor tool) gives you much more control than your sharpest kitchen knife. I was hesitant to buy one when I had a knife but switching ended up making me happy. There are four key things about Bread Lames you need to know:
- Straight vs. Curved Blades: Use a curved blade to create a flap that peels back into an “ear.” Use a straight blade for geometric designs and decorative wheat stalks. Some lames convert for straight or curved while some only allow for one option.
- Blade Maintenance: Change your blade every 10-30 loaves. A dull blade causes “dragging” or “shagging” (tearing) of the dough. To get the most out of each blade I rotate it so that I use each corner for about 10 loaves. I don’t keep track anywhere. Instead I pay attention to how well the blade cuts. If it starts getting hard to do a score that blade corner is dull and ready for a change.
- How to Hold a Lame: Hold your lame like a pencil for detail work, or with a firm, steady grip for long expansion slashes.
- What Bread Lame Is Best For Beginners? To get the low down you can read my Sourdough Tools Guide here. I cover the different kinds of lames on the market and which one would fit what you want to do.
Basic Scoring Techniques for Success
Angle of the Blade: For a classic ear, hold the blade at a 45 degree angle to the dough. For decorative leaves or wheat stalks, hold the blade at a 90 degree angle (straight up and down).
The “Confidence” Factor: Don’t hesitate! Make swift, decisive slashes. If you go too slow, the blade is more likely to drag and pull the dough. Remember to hold the tension with the hand that isn’t cutting. That light tension makes such a difference!
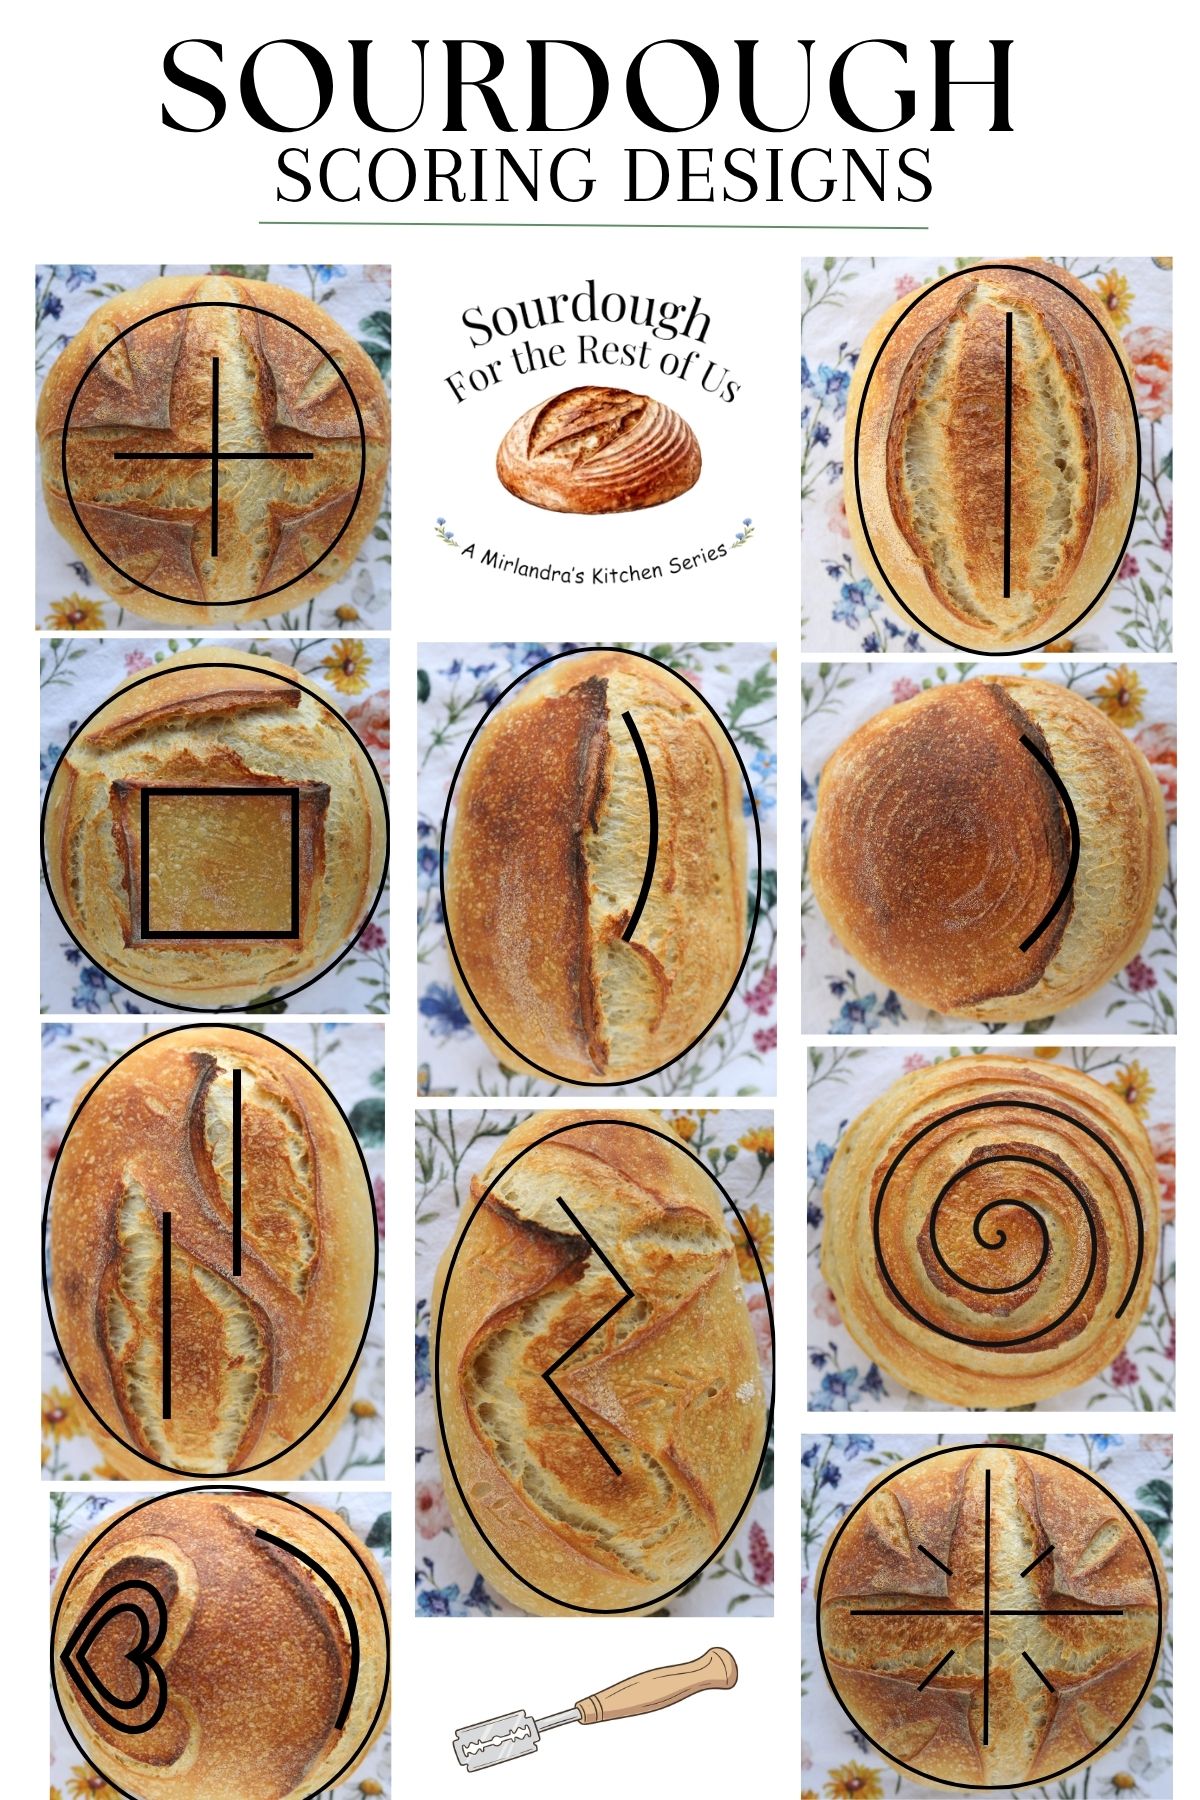
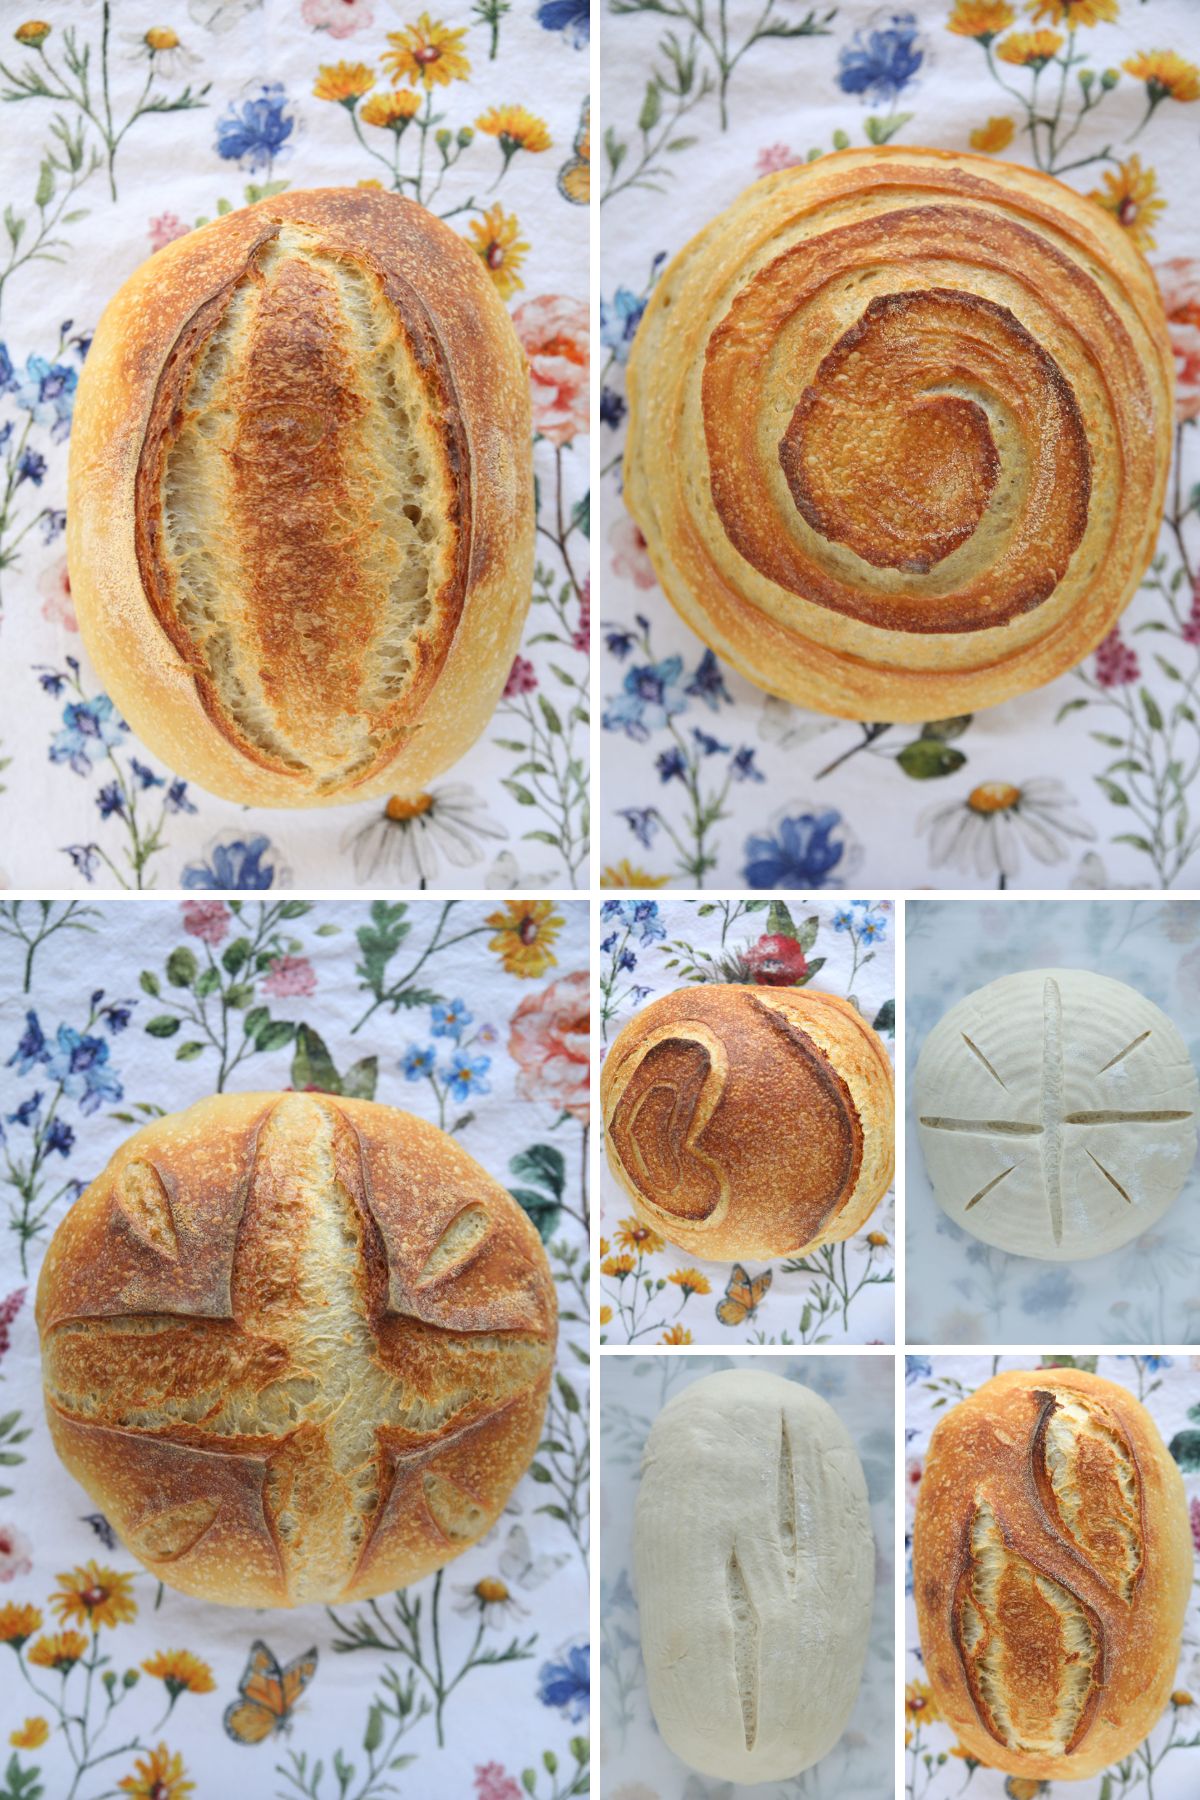
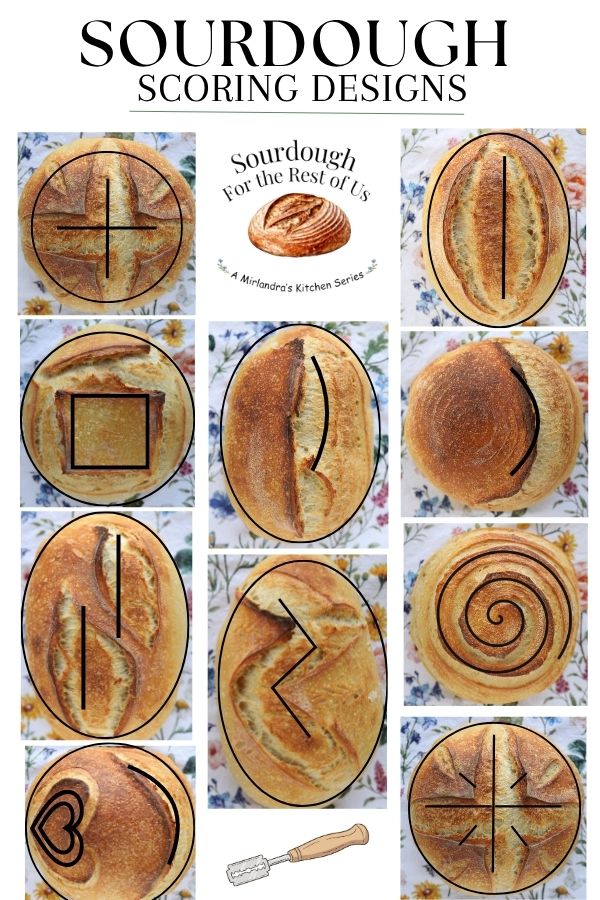
10 Beginner Sourdough Scoring Patterns
Each of these scoring designs is intended to be a solid win for beginners. All of them will reward you with a fun, decorative loaf.
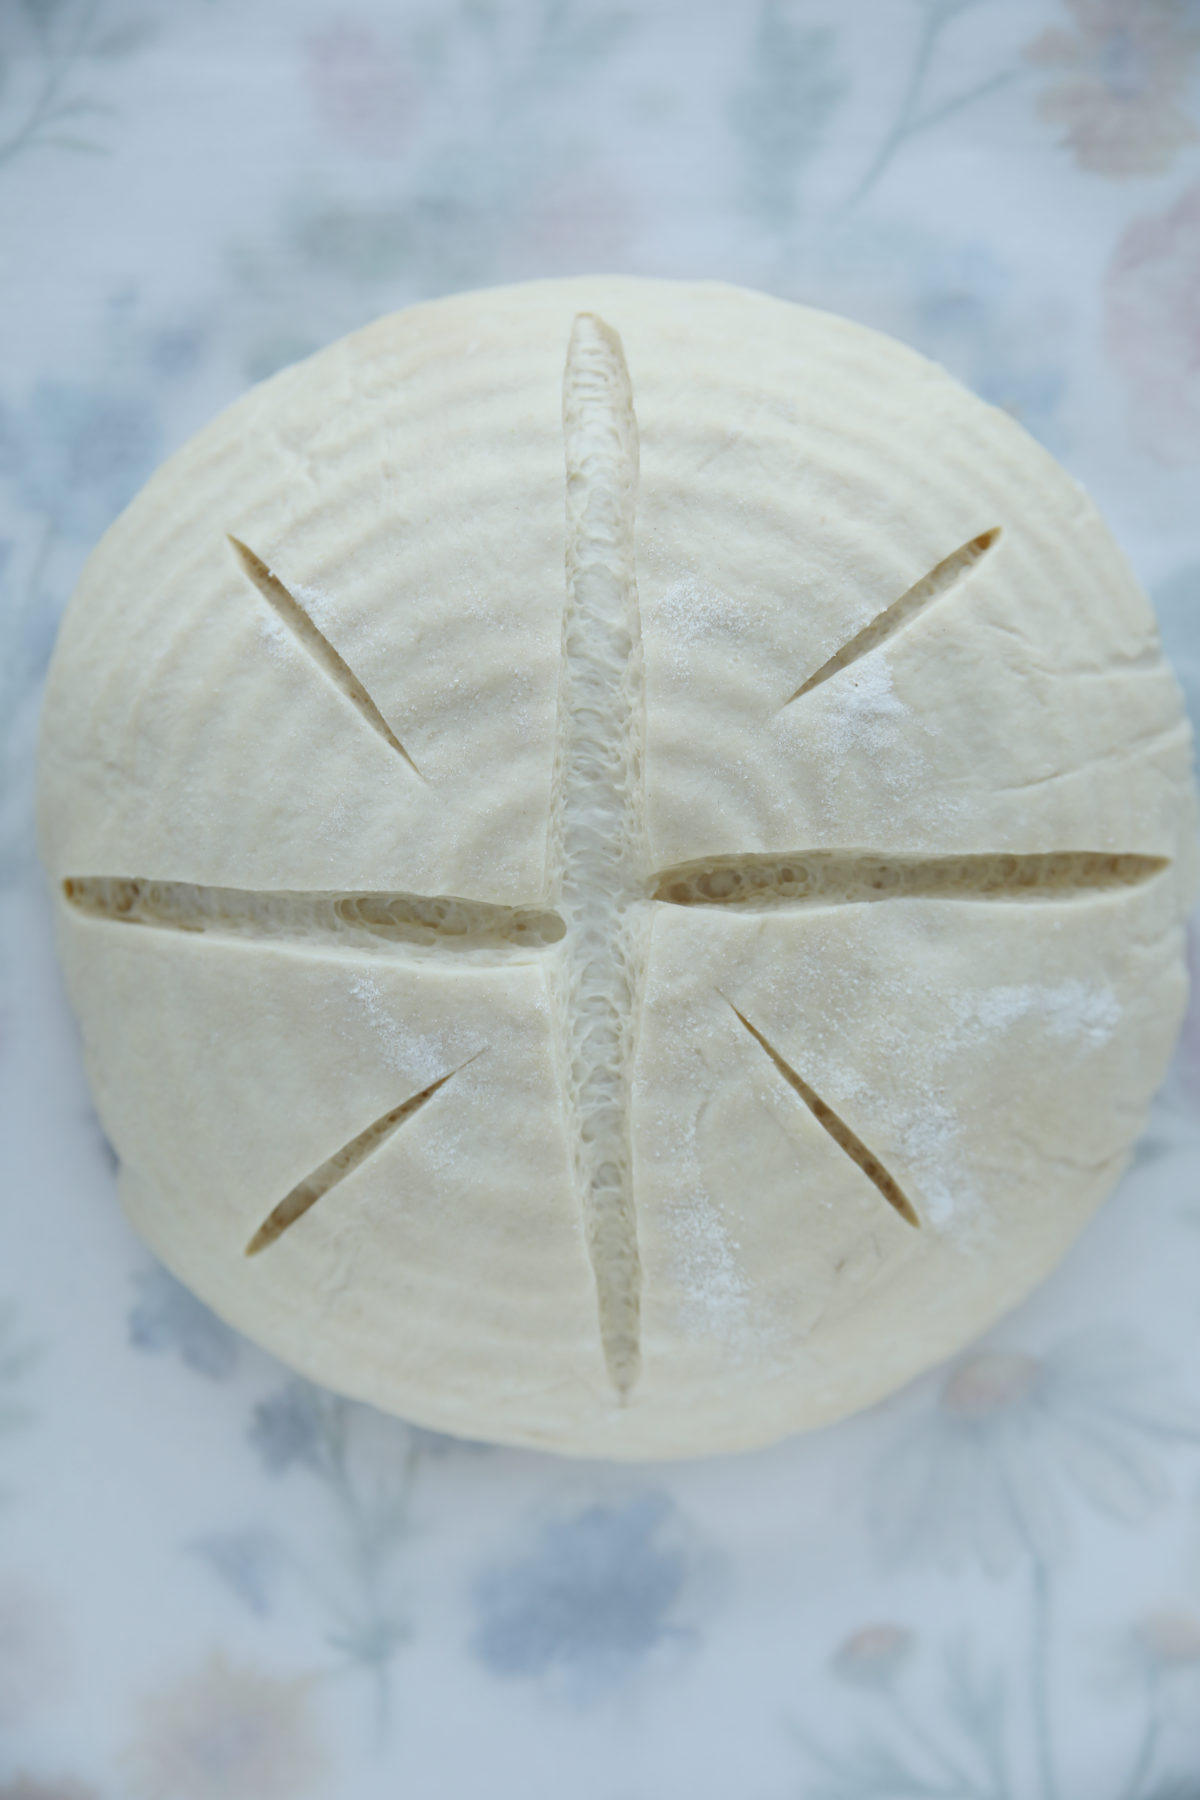
For round boule loaves my favorites are the classic cross and the twinkling star. Both are simple and always look beautiful while allowing for a great oven spring loaf expansion.
When I’m doing a oval batard shaped loaf (my favorite shape by the way) I usually pick a classic double ear score (one line down the center of the batard). My other favorite for this shape is the double score. It’s so easy and so pretty!
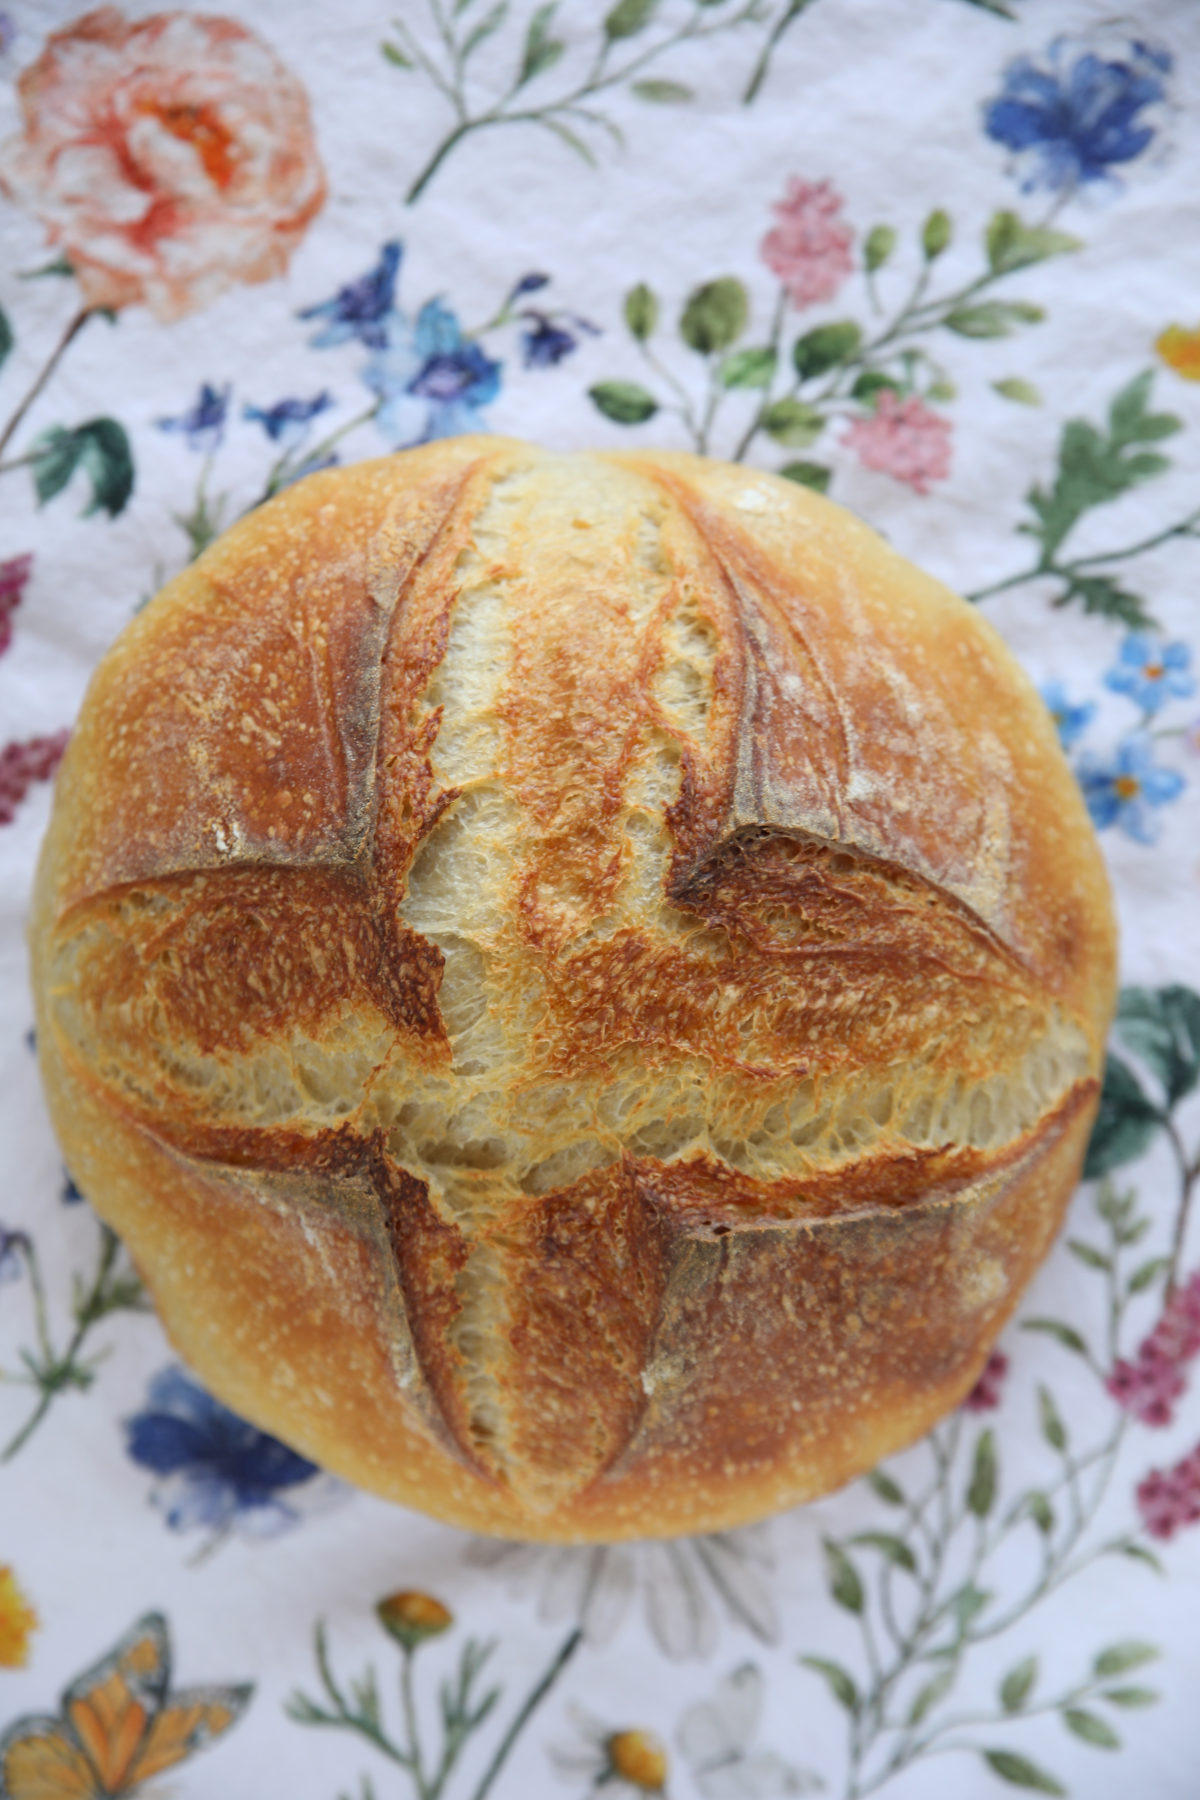
#1 – The Classic Cross
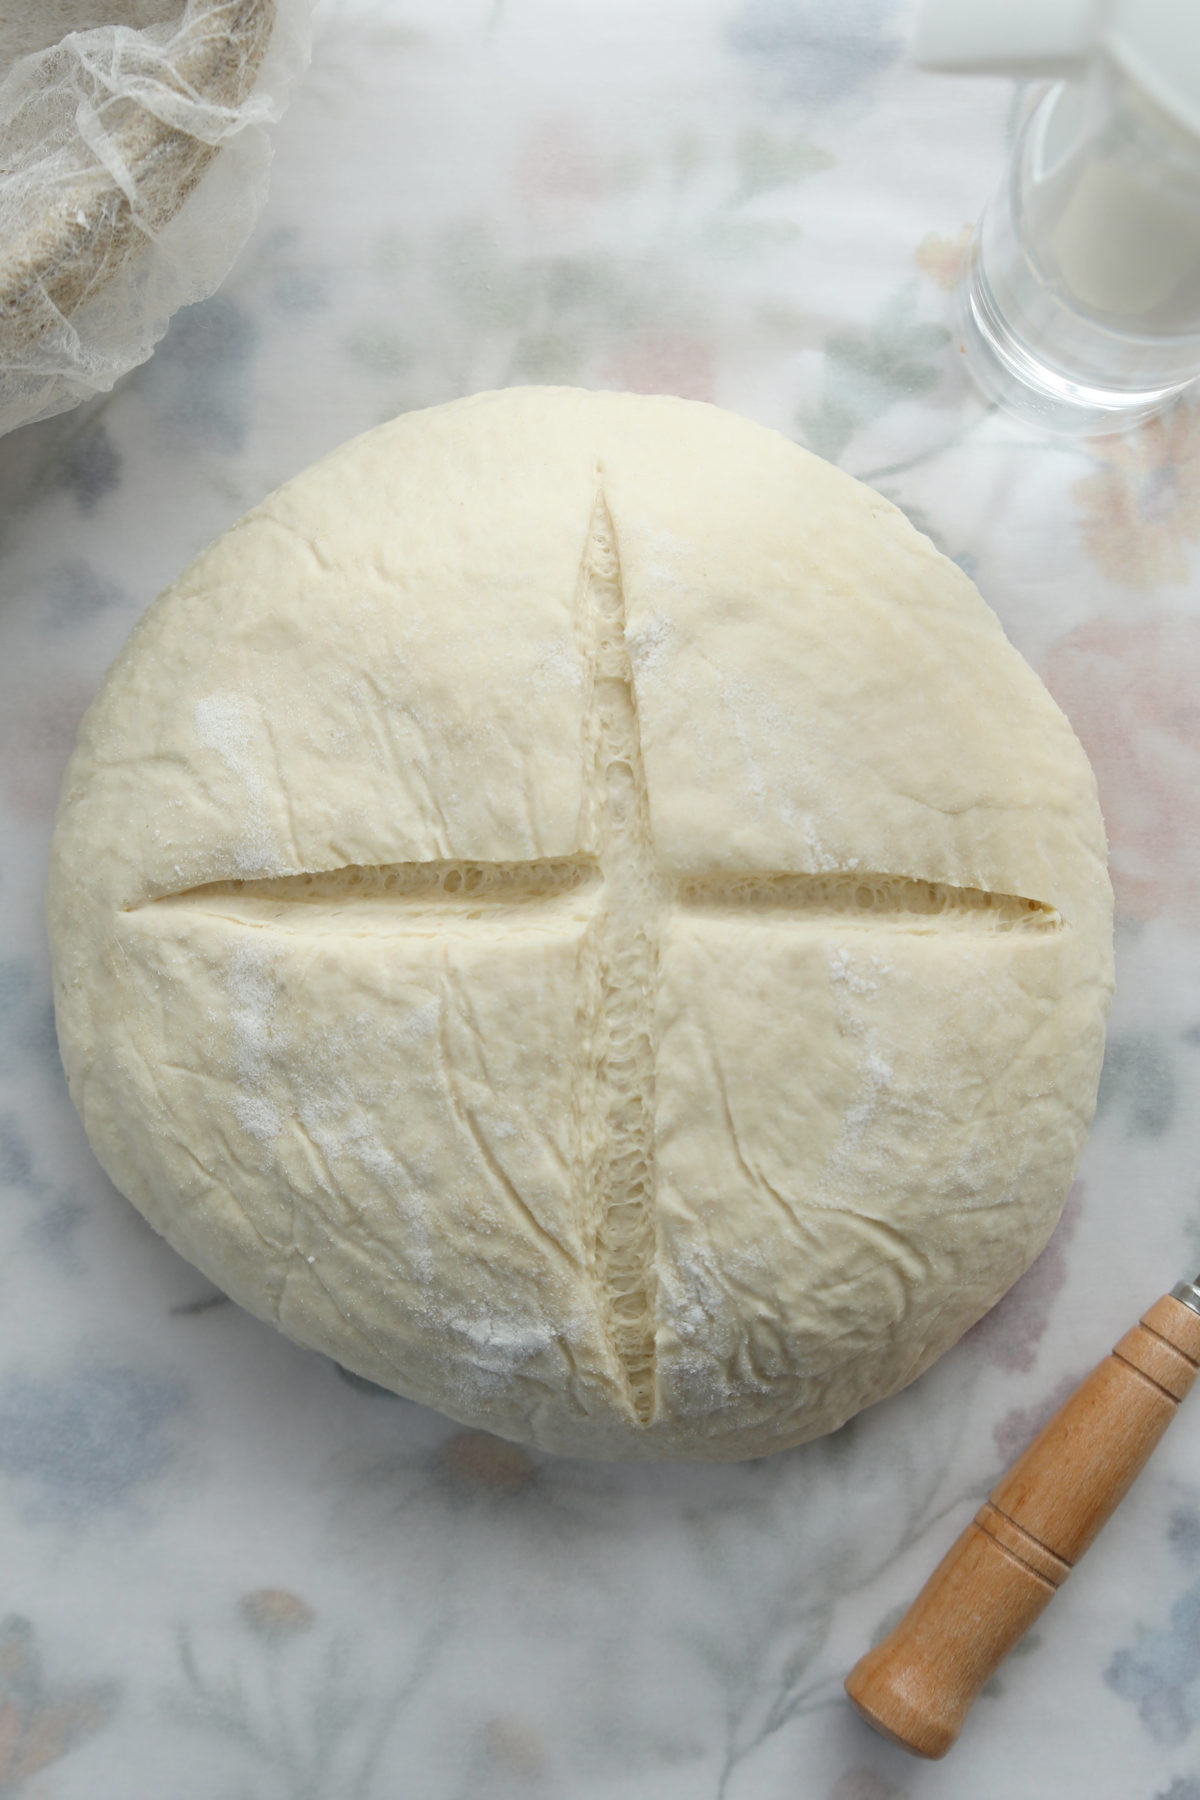
Best for: Round boules.
- How to do it: Hold tension and use a straight lame to make two deep perpendicular cuts across the center.
- Depth and Angle: Cut 1/2 inch deep at a 90 degree angle.
- Pro-Tip: Picture going a little deeper than the height of a mini marshmallow.
2. The Center Batard Score (Double Ear) – Batard
Best for: Oval loaves (batards). The Goal: A balanced, symmetrical look that provides maximum expansion.
- How to do it: Hold tension and use a straight lame to make one swift, deep cut straight down the vertical center of the loaf, from one end to the other.
- Depth and Angle: 1/2 inch deep at a 90-degree angle (straight up and down). This usually results in a “double-ear” style where the bread opens up evenly on both sides of the cut.
- Pro Tip: Use the corner of the lame to cut INTO the bread and then pull so the edge of the razor us cutting.

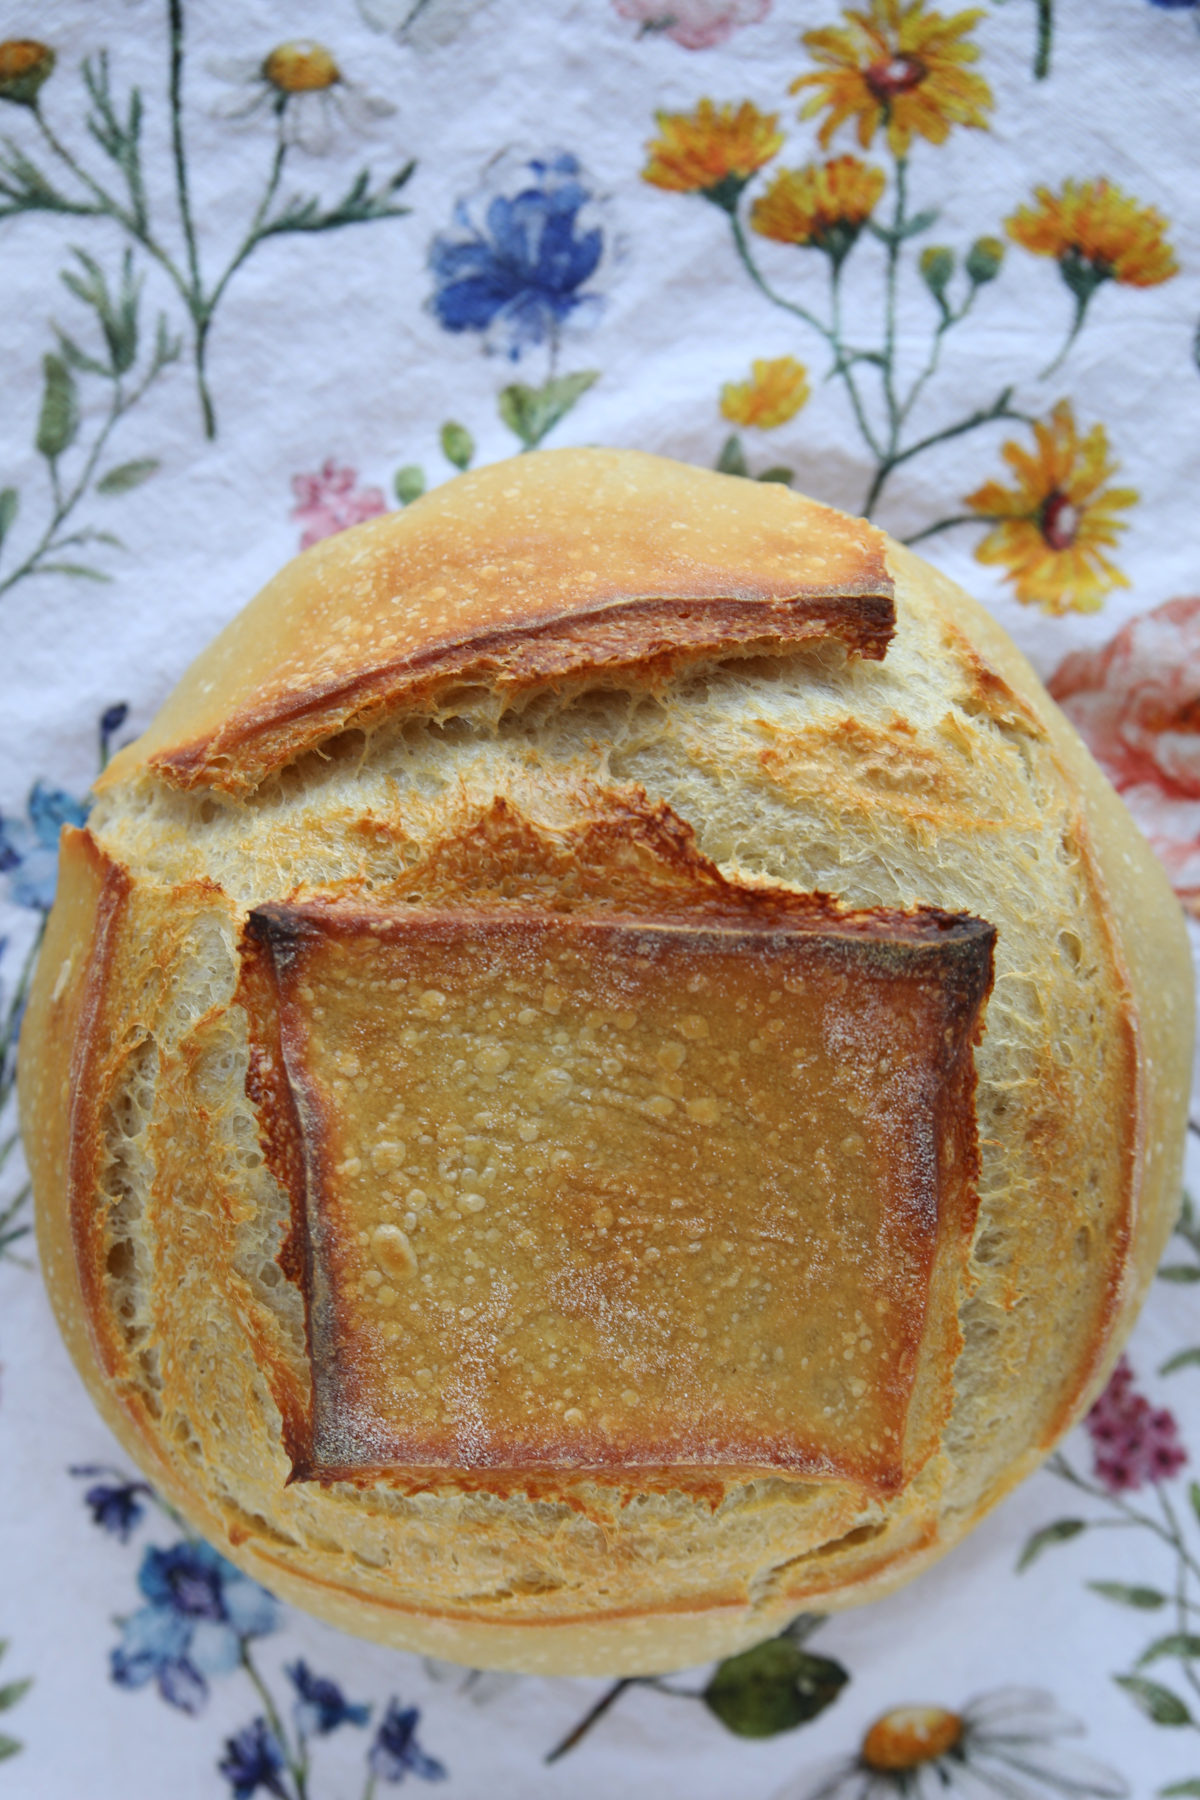
3 The Square (Box) – Round
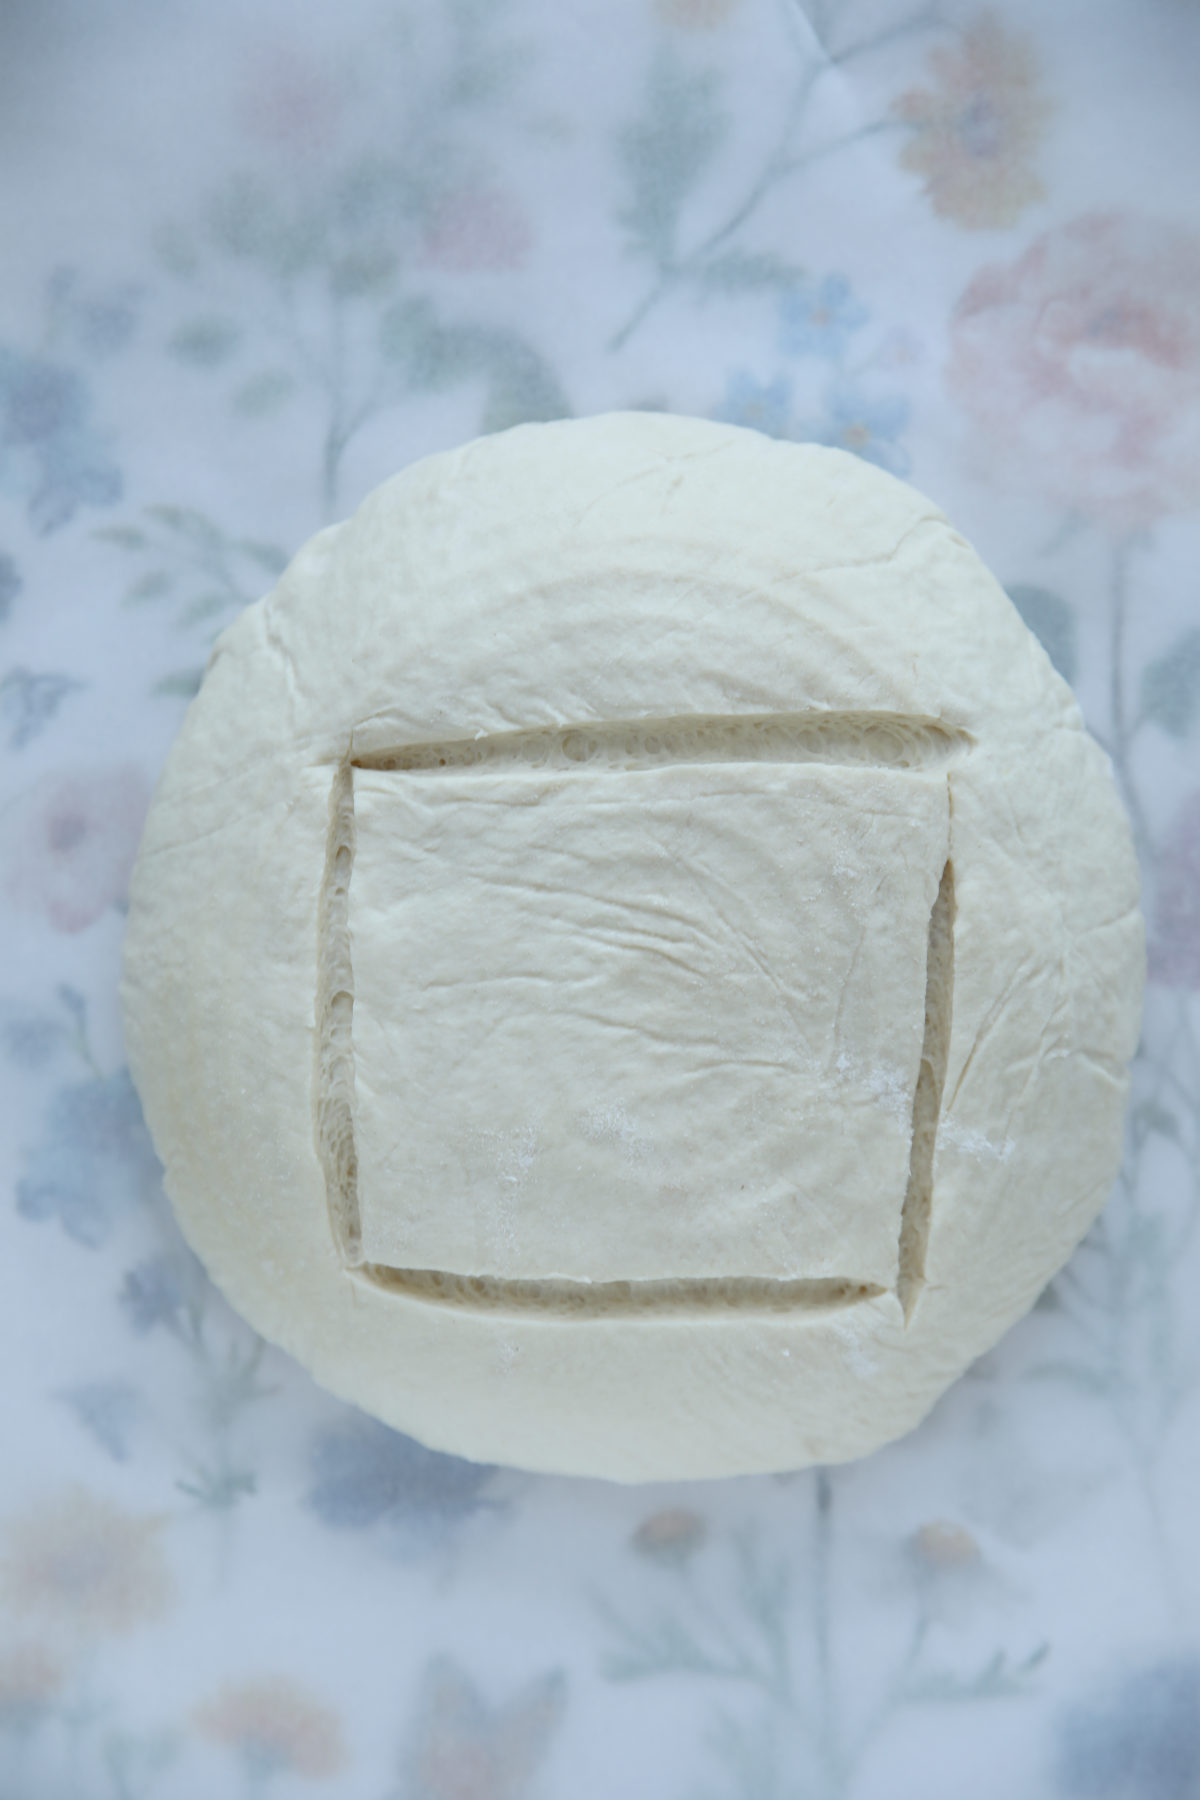
Best for: Round boules or slightly oval loaves. The Goal: A “picture frame” effect where the center of the crust lifts up like a lid.
- How to do it: Instead of crossing through the center, you’re going to cut a square around it. Imagine a 4-inch square on top of your loaf. Use a straight lame to make four straight cuts to connect the corners.
- Depth and Angle: Medium—about 1/4 to 1/2 inch at a 90-degree angle.
- Pro Tip: If you want the center to stay relatively flat while the edges “pop,” keep these cuts shallow. For a dramatic “explosion” in the middle, cut a bit deeper. (Side note – I don’t love this score. It looks weird to me but it is a favorite with many beginners. Give it a try if you think it looks fun!)
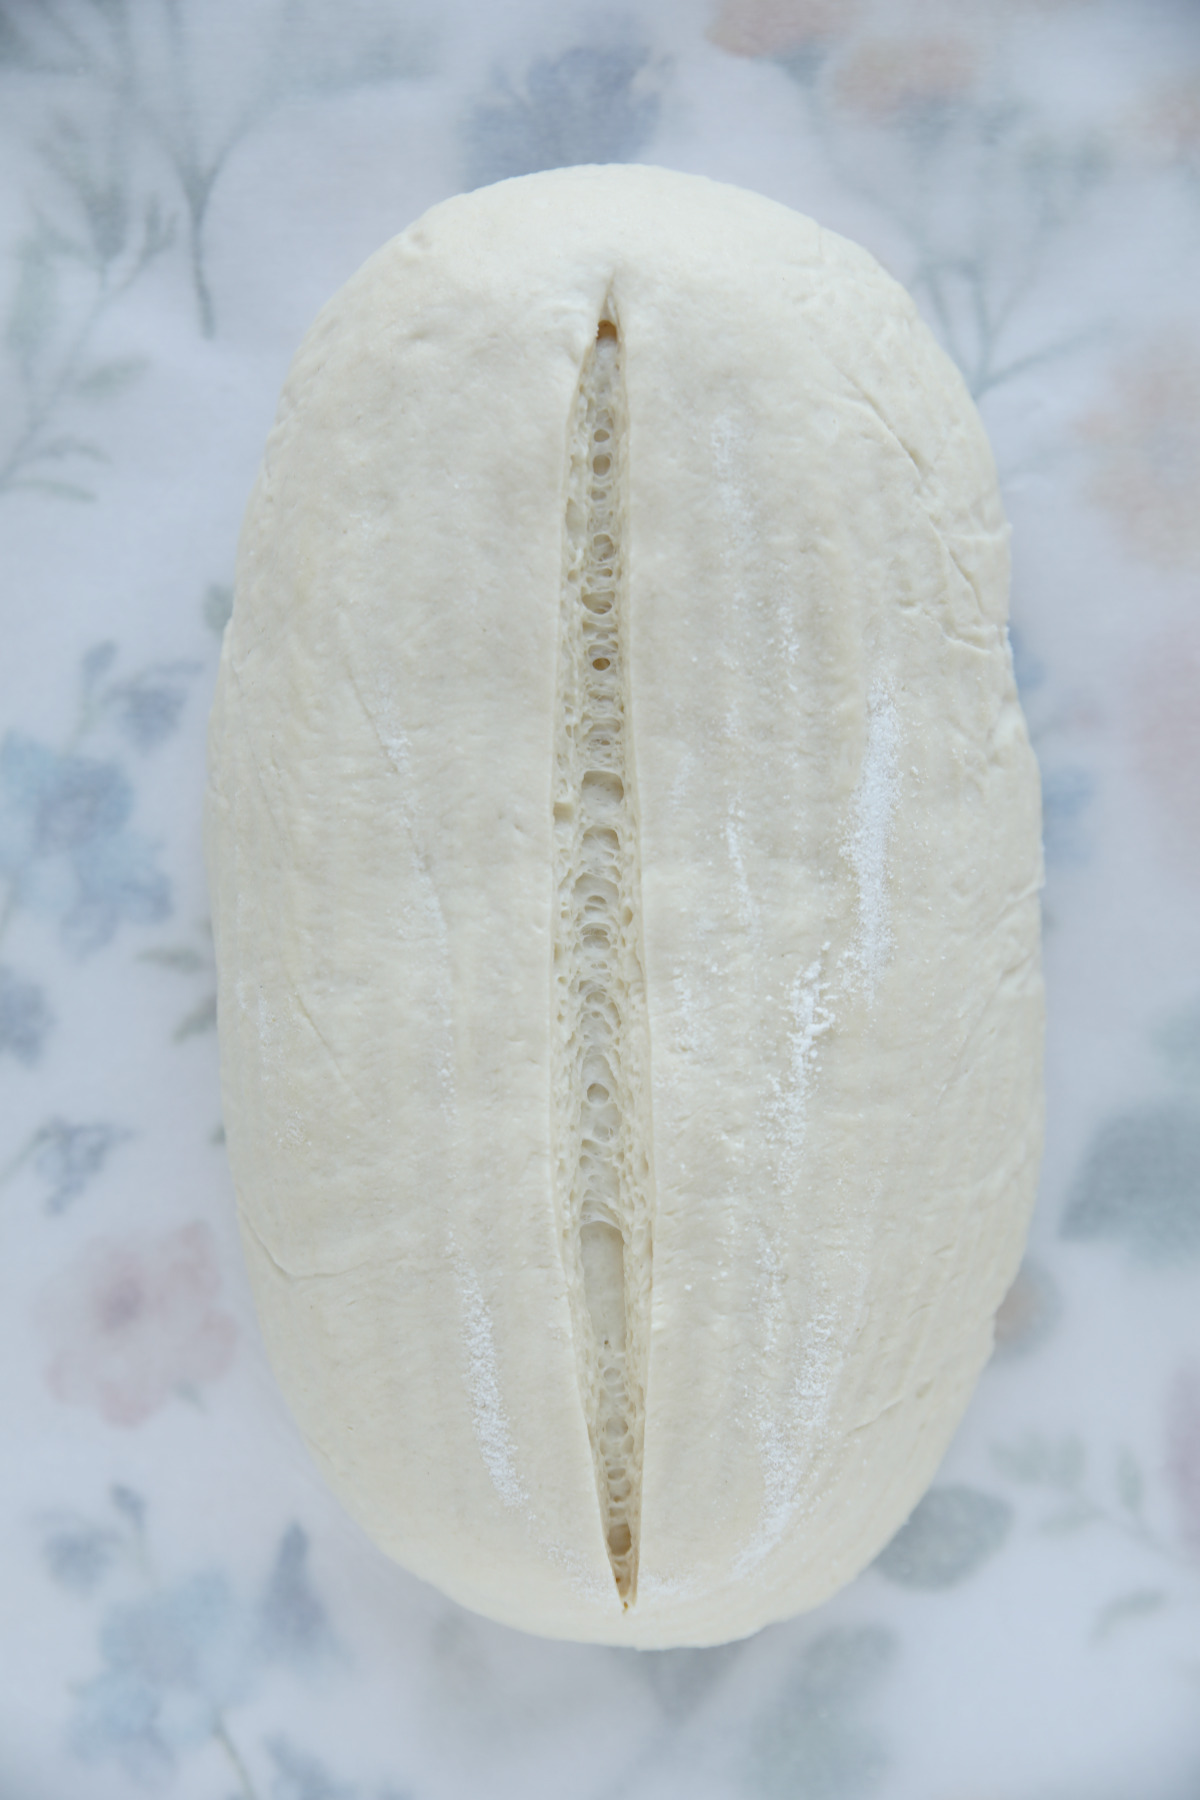
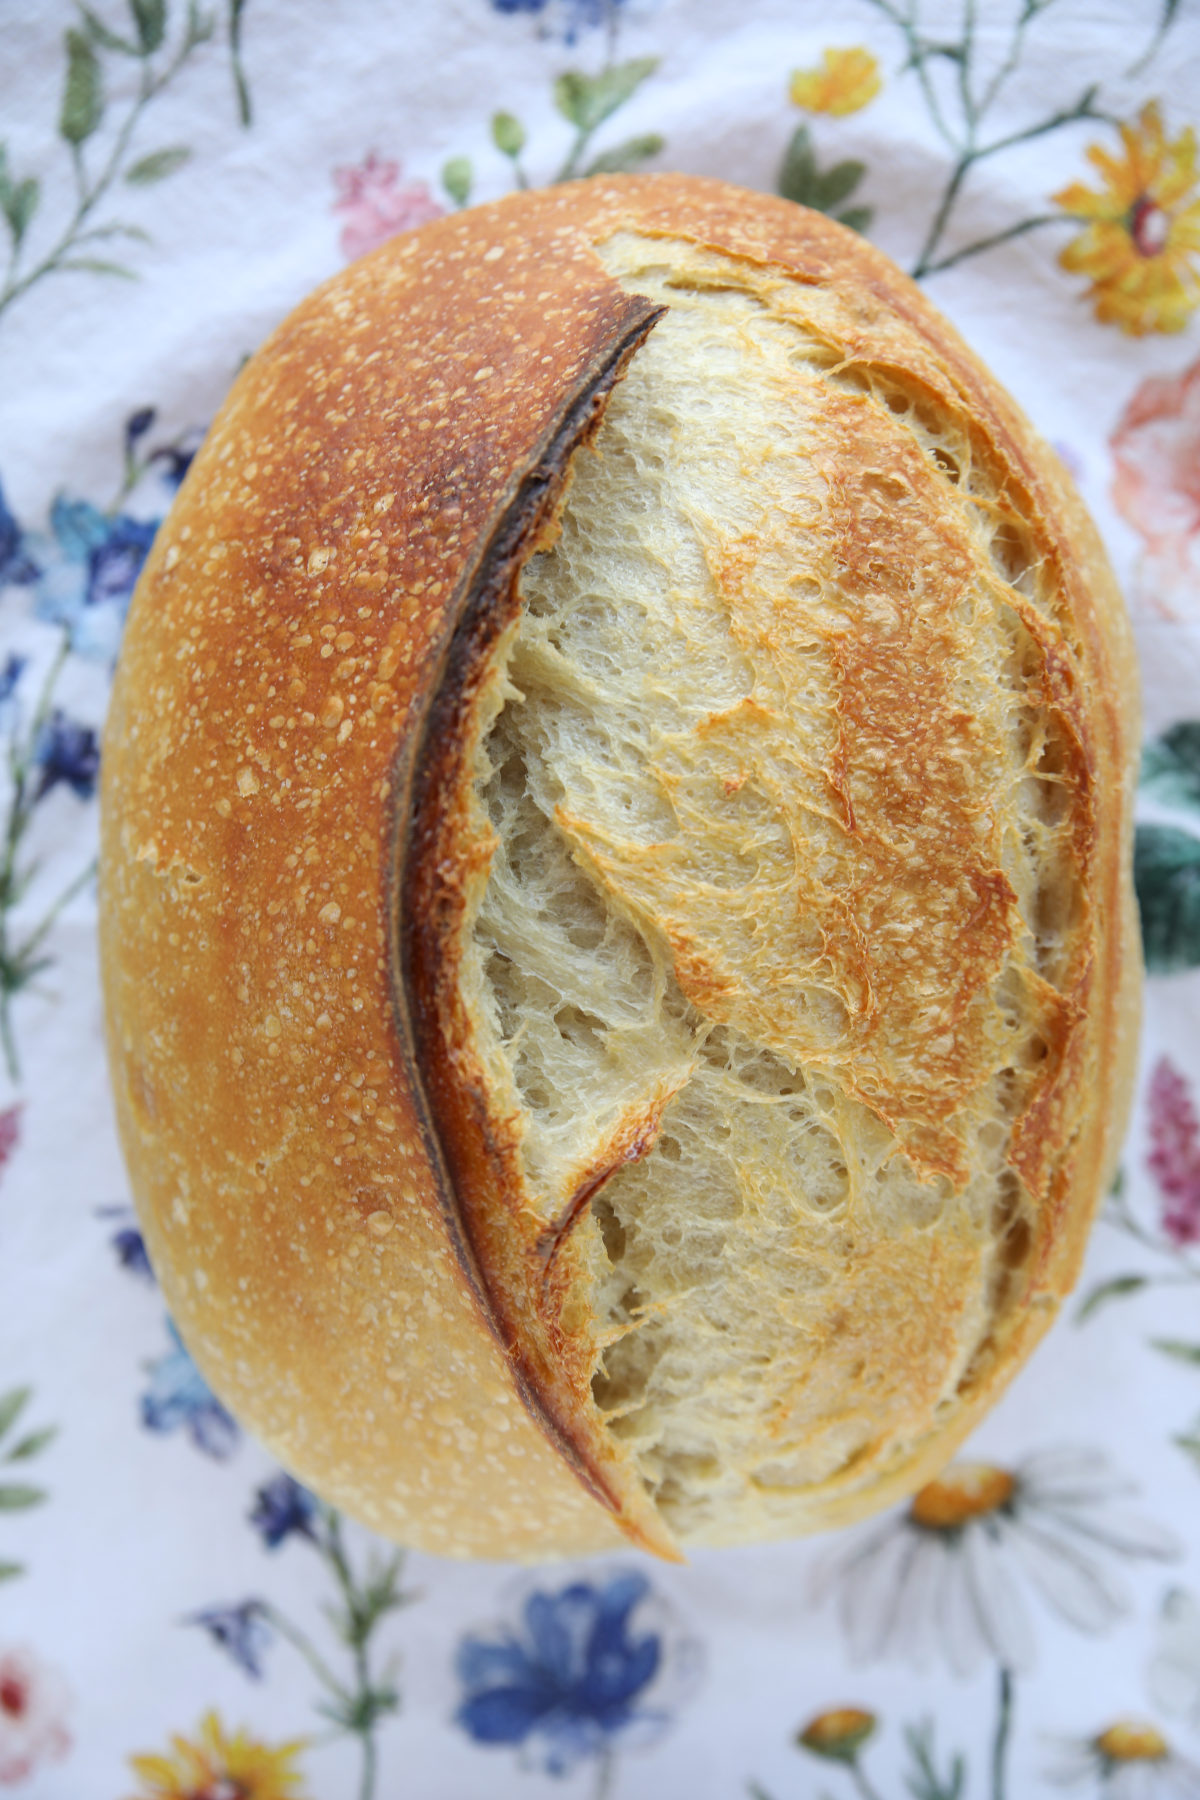
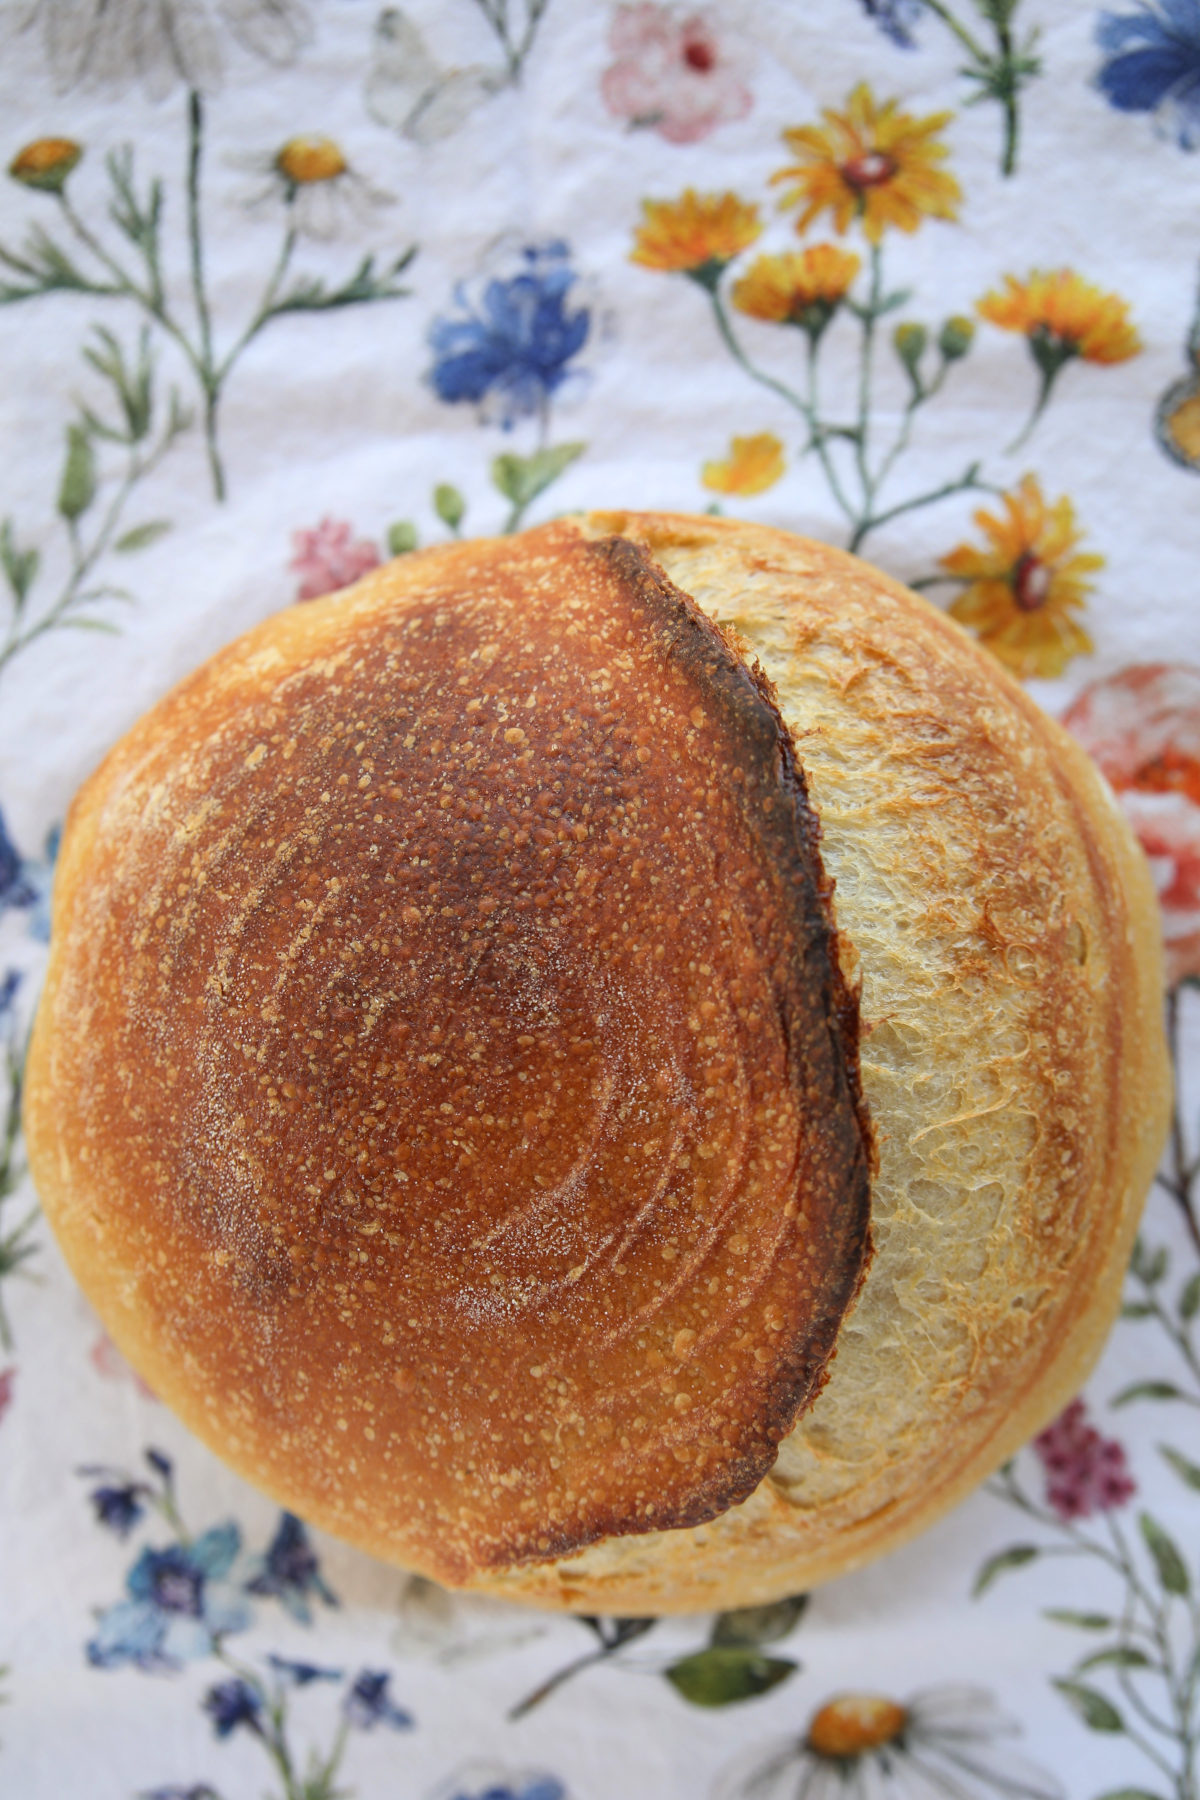
4. The Single Long Slit (The Classic Ear) – Batard
Best for: Oval loaves (batards). The Goal: That coveted, crunchy “ear” that everyone wants to show off. (For the life of me I don’t know why everybody wants an “ear” but it is a classic right of passage for any sourdough baker so there ya go!)
- How to do it: This is a bit more technical but it isn’t too hard. Use a curved lame. Start about an inch from the top and make one long, continuous curved “slash” down to an inch from the bottom.
- The Secret Angle: Don’t hold the blade straight. Hold your lame at a 30-degree angle (almost flat to the dough), “tucking” the blade slightly under the surface as you slice to 1/2 inch deep.
- Pro Tip: That tucked angle is what creates the “flap” that peels back in the oven to form the ear. It feels weird the first time but your bread dough will love it.
5. The Crescent (C-Shape) – Round

Best for: Round boules. The goal is a clean, curved “ear” that follows the natural shape of the loaf.
- How to do it: Use a curved lame. Imagine a large “C” that hugs one side of the loaf, about two inches in from the edge. Hold tension and start at the top and follow the curve down to the bottom in one swift motion.
- Angle and Depth: Hold the lame at a 30-degree angle, pointing the blade under the center of the loaf. Cut about 1/2 inch. This encourages the “C” to peel back and lift.
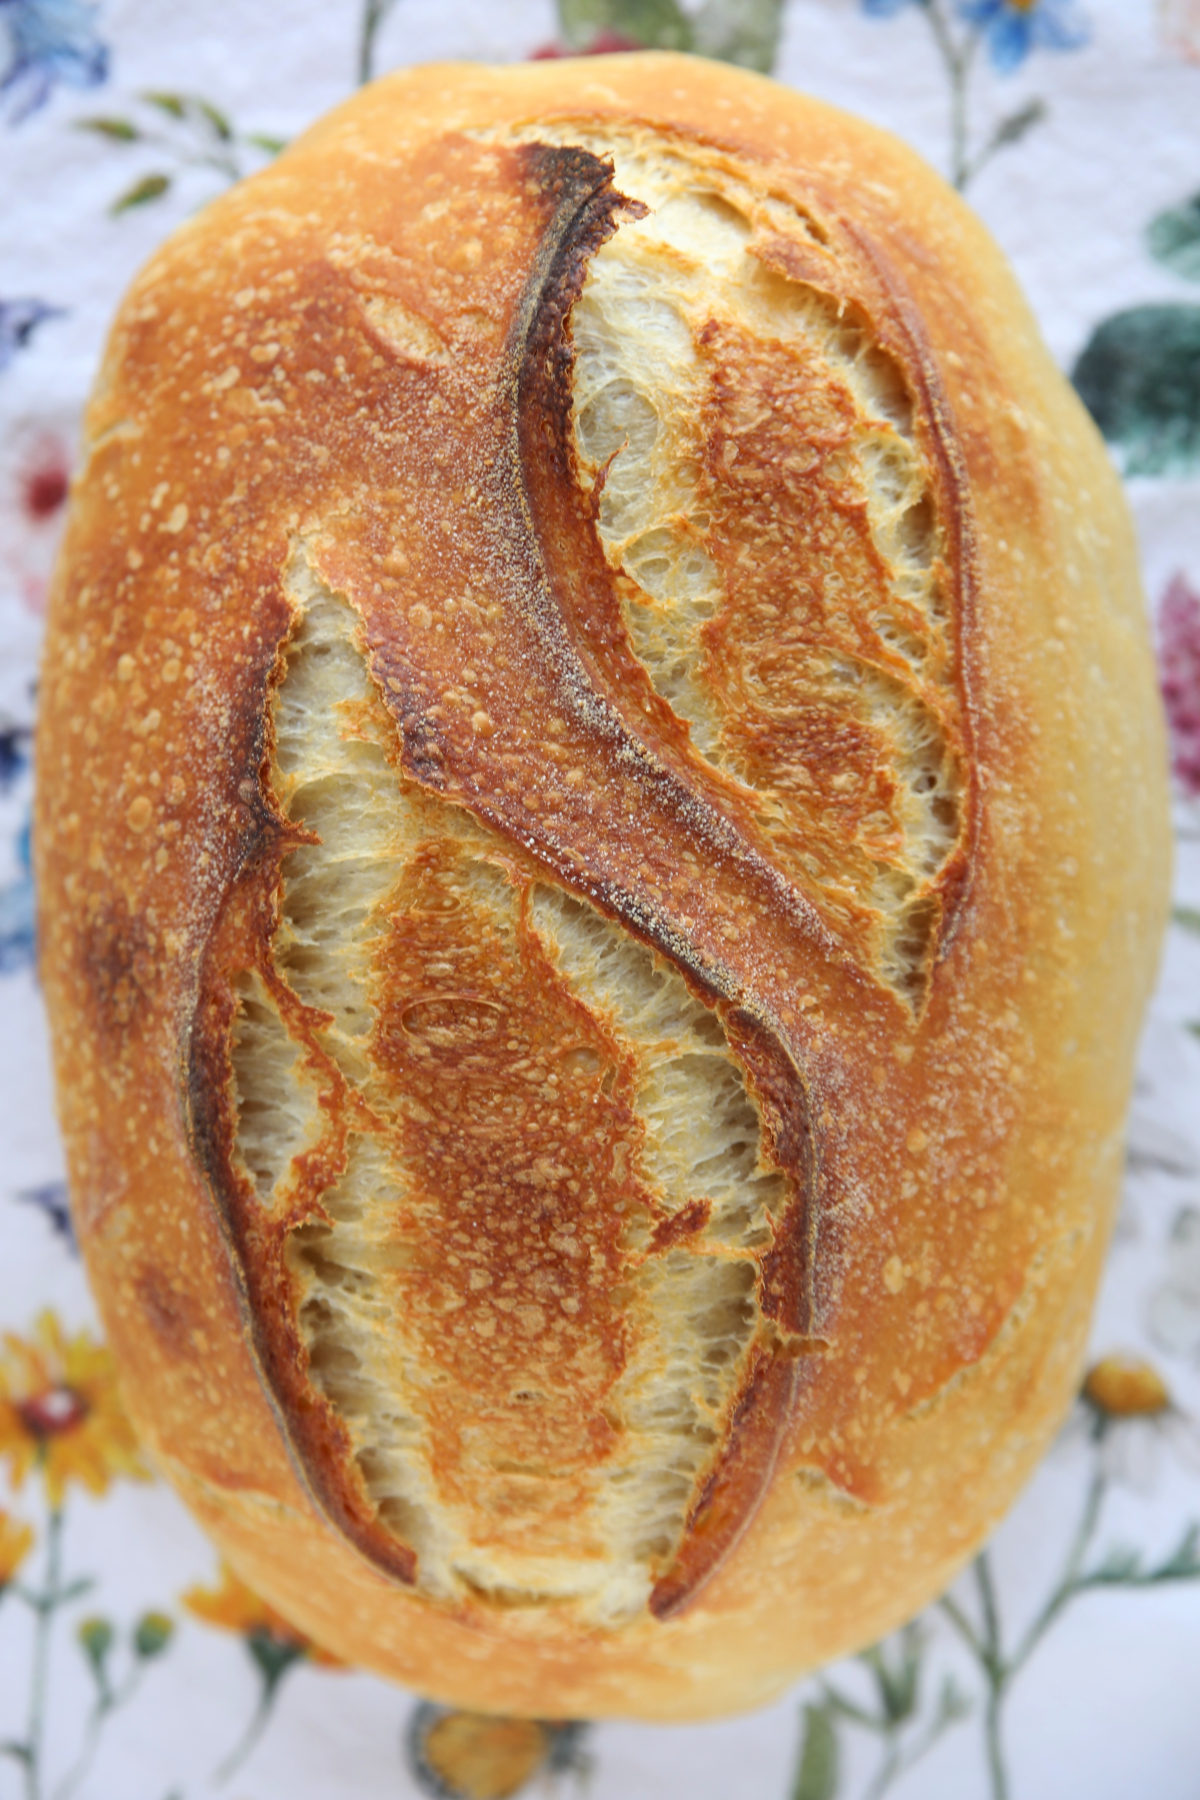
6. Double Score Meeting in the Middle – Batard
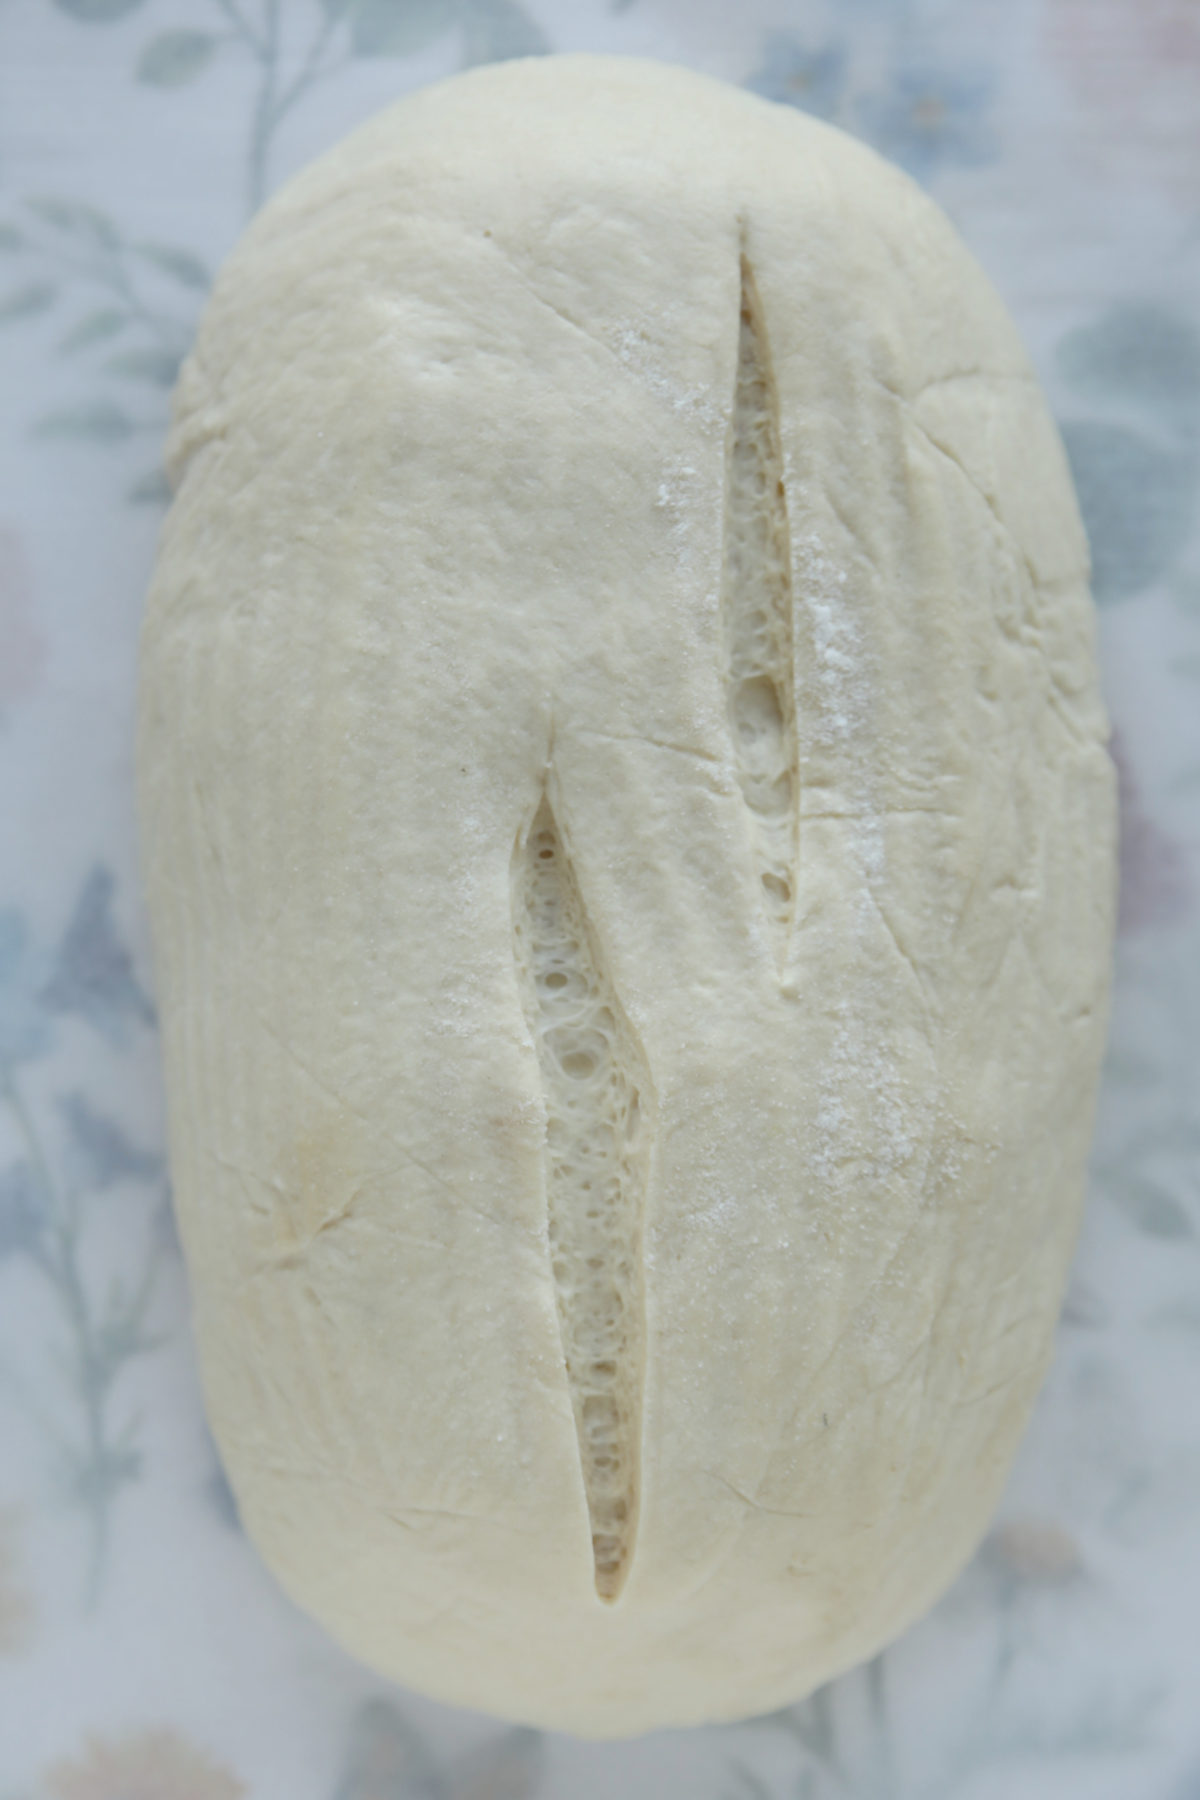
Best for: Oval loaves (batards).
The Goal: A sophisticated, symmetrical look that lets the center of the loaf “bloom” upward evenly.
- How to do it: Use a straight lame. Hold tension and pick a spot to the right of center. Cut once from the top down about 2/3rds of the way on the loaf. Then move over about an inch and start your cut about 2 inches above the end of the first cut. Make another straight line down to the far end of the loaf.
- Depth and Angle: Cut 1/2 inch deep. Hold your blade at a 90-degree angle.
- Pro-Tip: This is a classic for a reason—it creates two beautiful, smaller “ears” and gives the bread a very professional, “bakery window” profile. When I picture beautiful bread I picture this score!
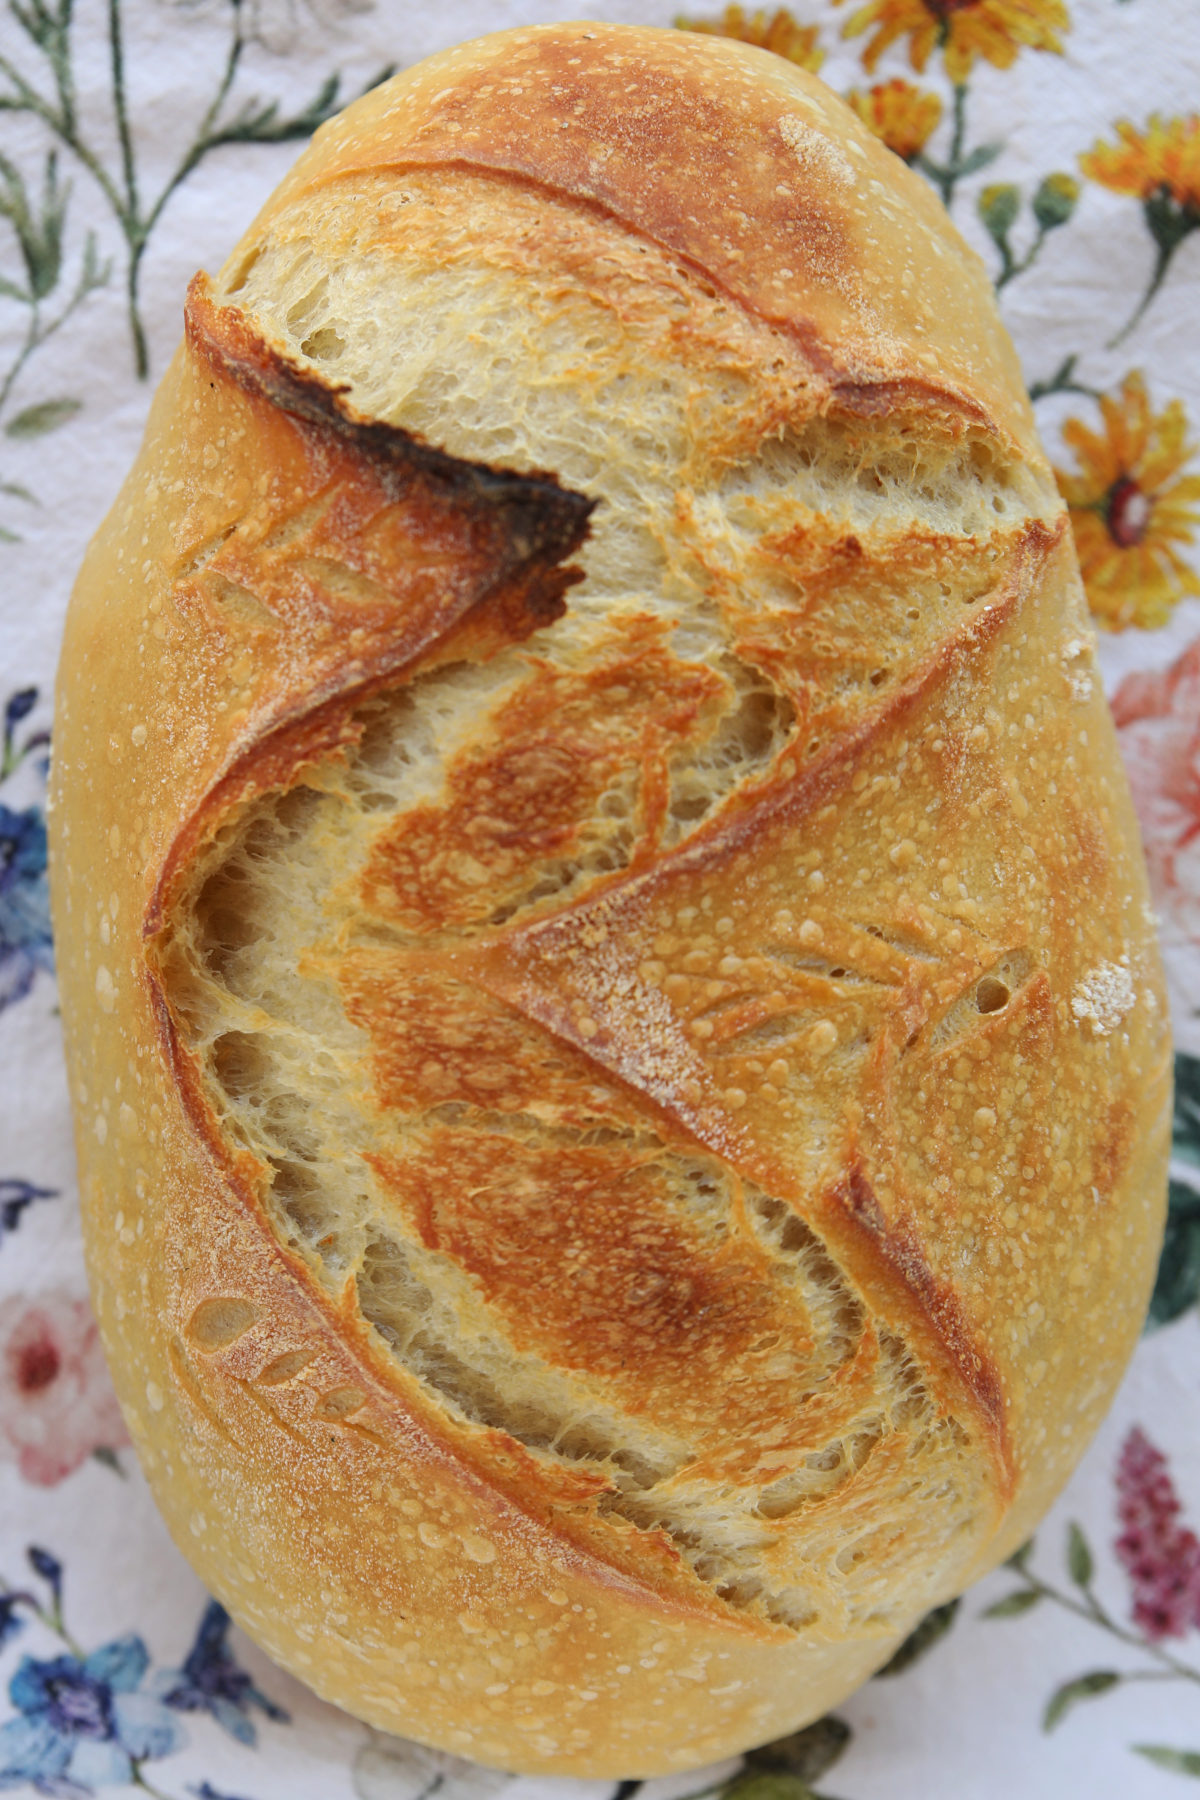
7. The Zig Zag w/ Optional Wheat – Batard
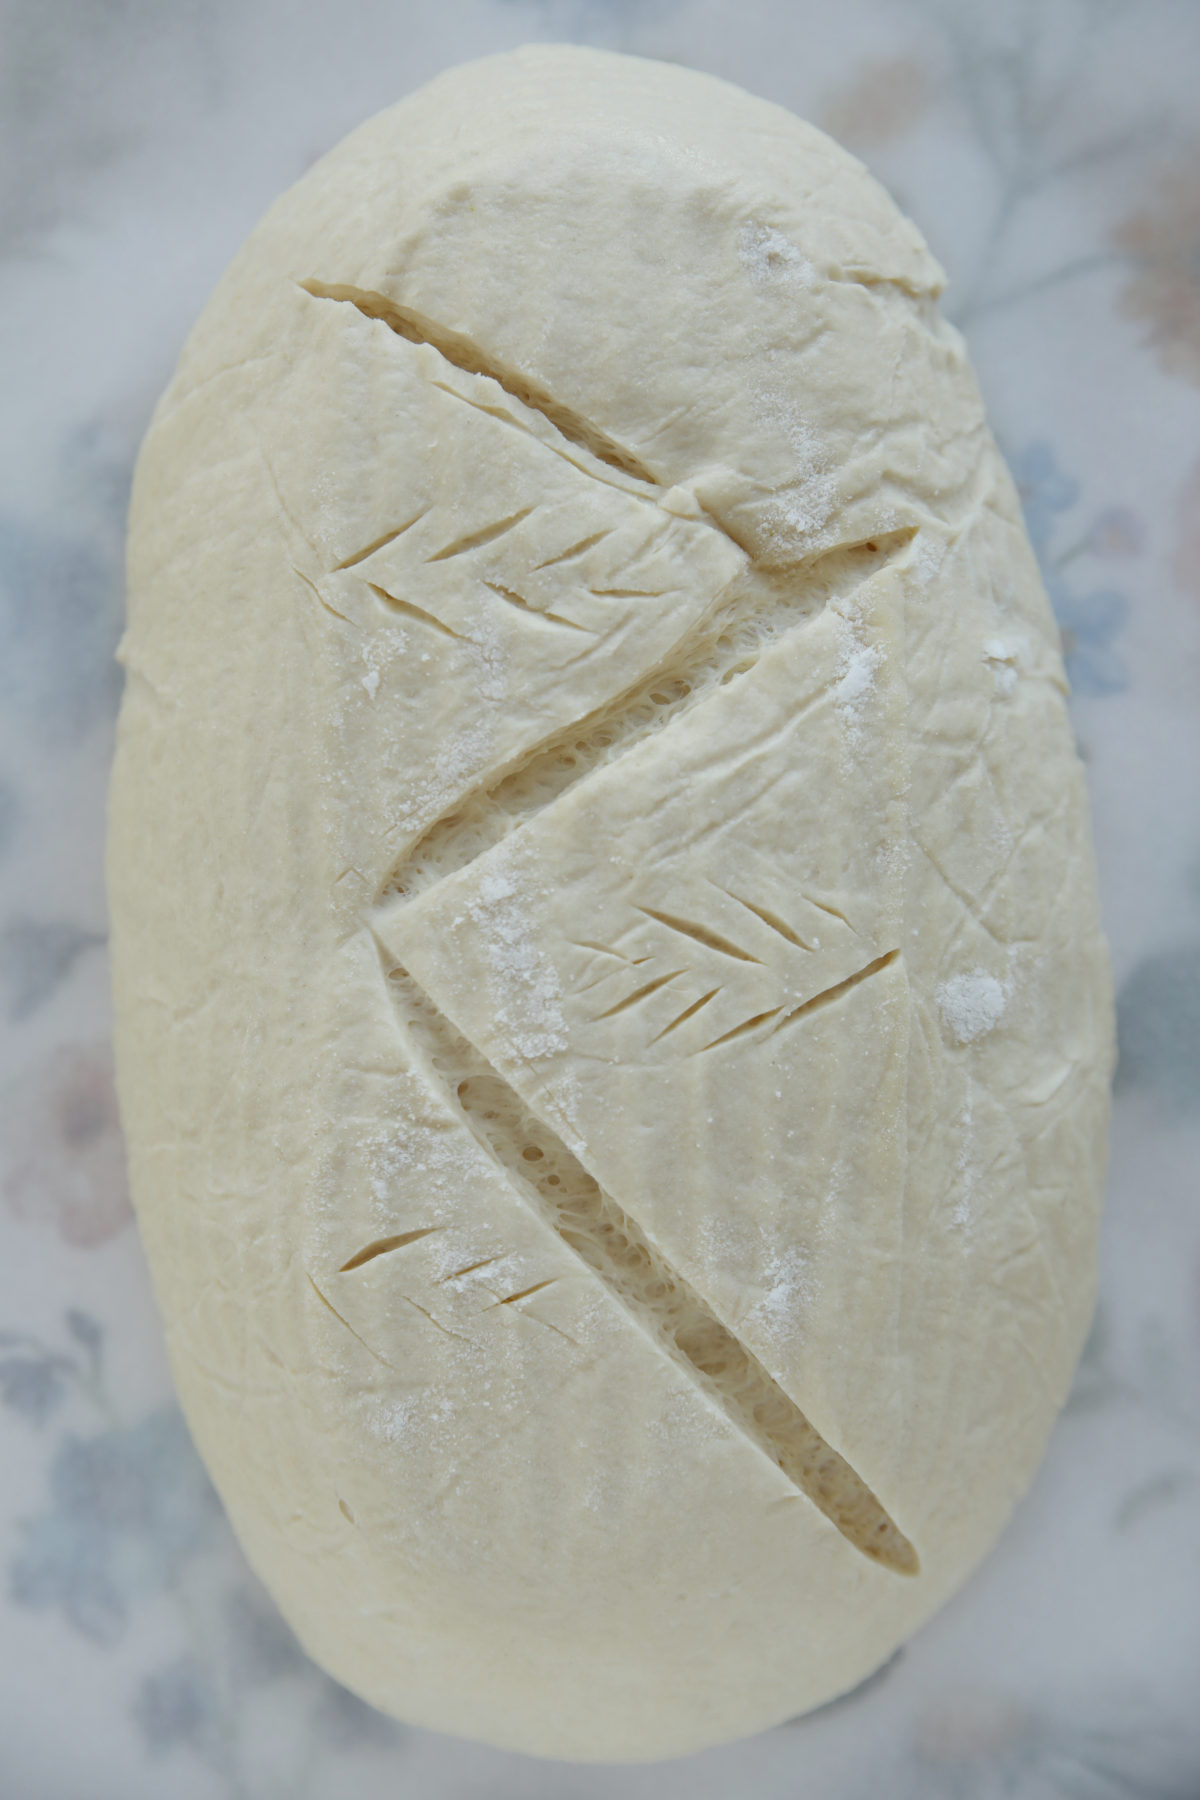
Best for: Any shape (Boule or Batard). The Goal is a high-impact “artisan” look that is surprisingly easy to execute.
- How to do it: Hold tension and use a strait lame to cut three connected zig zag lines into the bread.
- Depth and Angle: Go for 1/2 inch deep at a 90-degree angle.
- Pro Tip: If you want to add wheat stalks use the very tip of the lame to cut little wheat stalks into the dough wherever you want.
Crazy Fact: I actually dropped a Dutch oven lid on this one right before the dough went into the oven and it still looked beautiful—oven spring covers a multitude of sins!
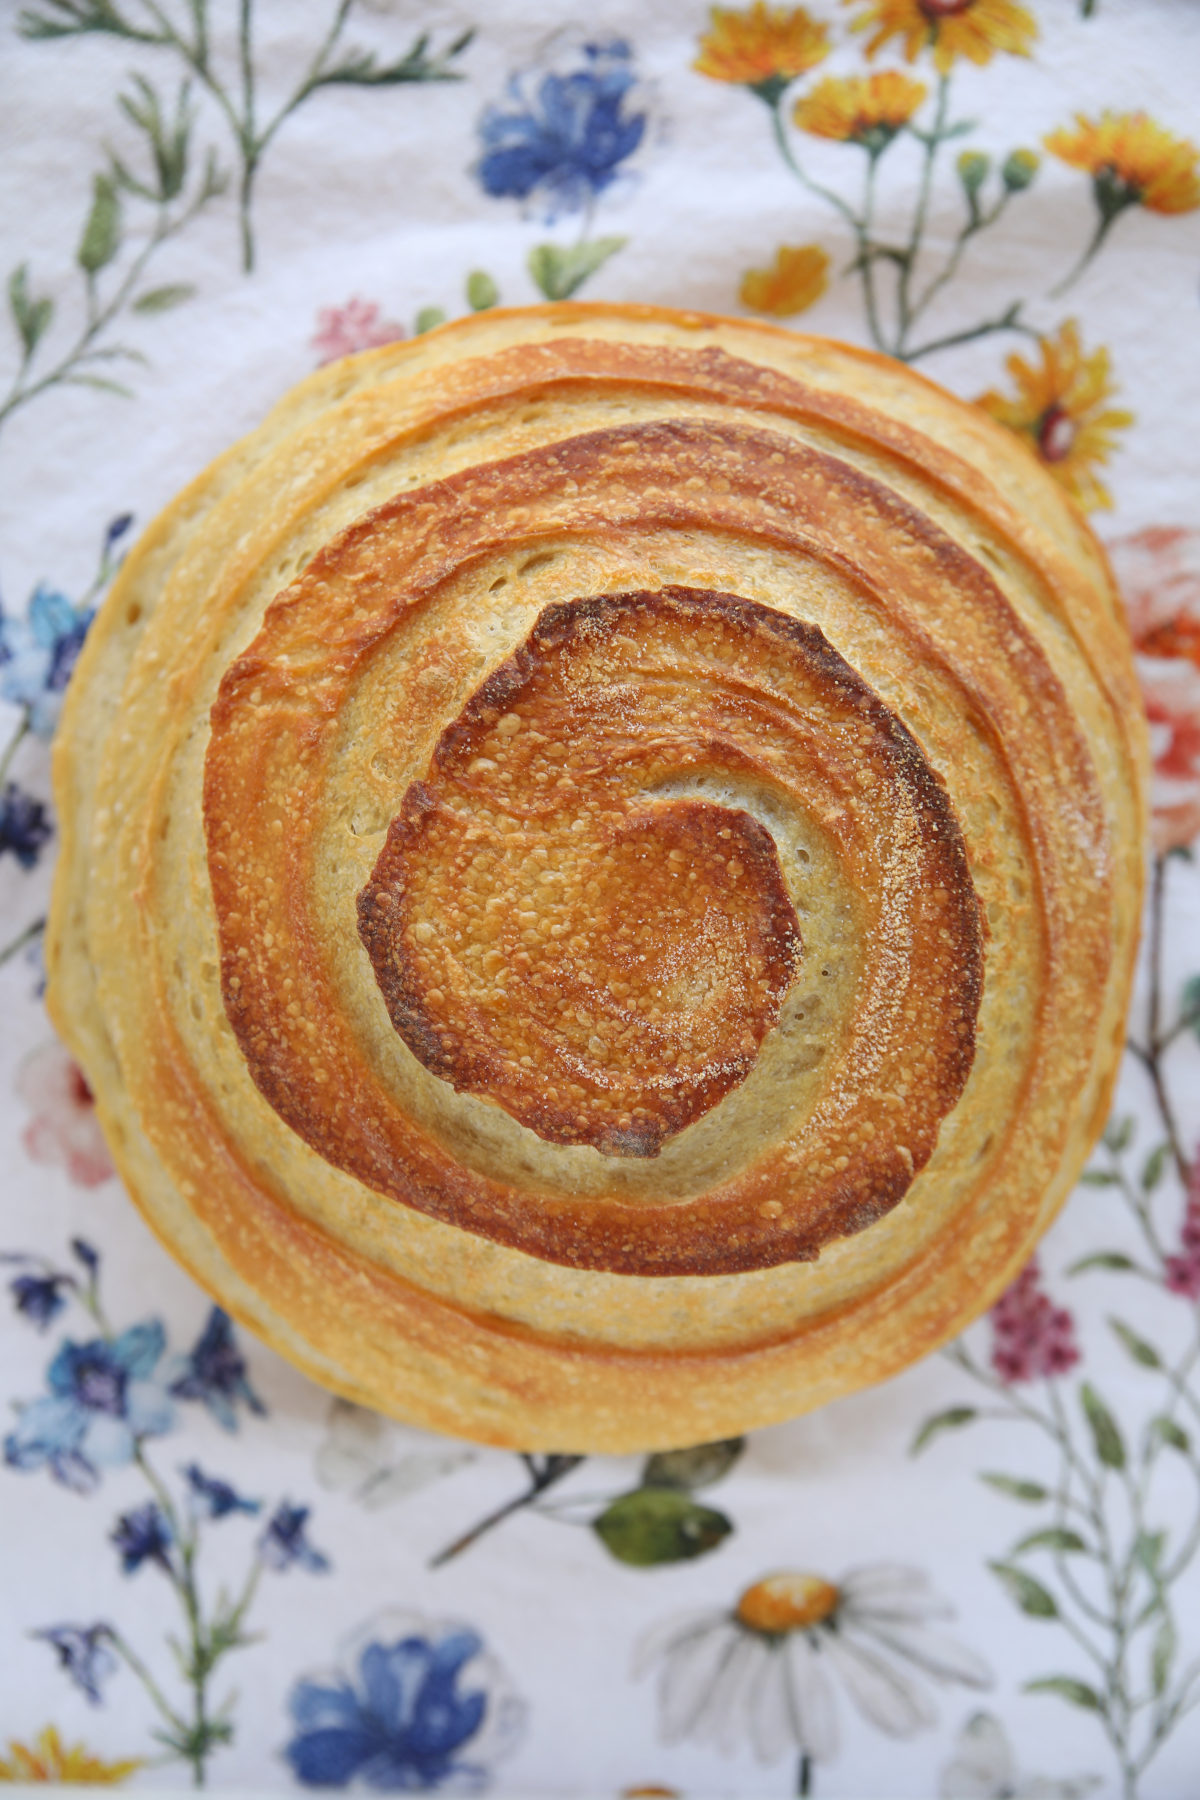
8. The Spiral – Round
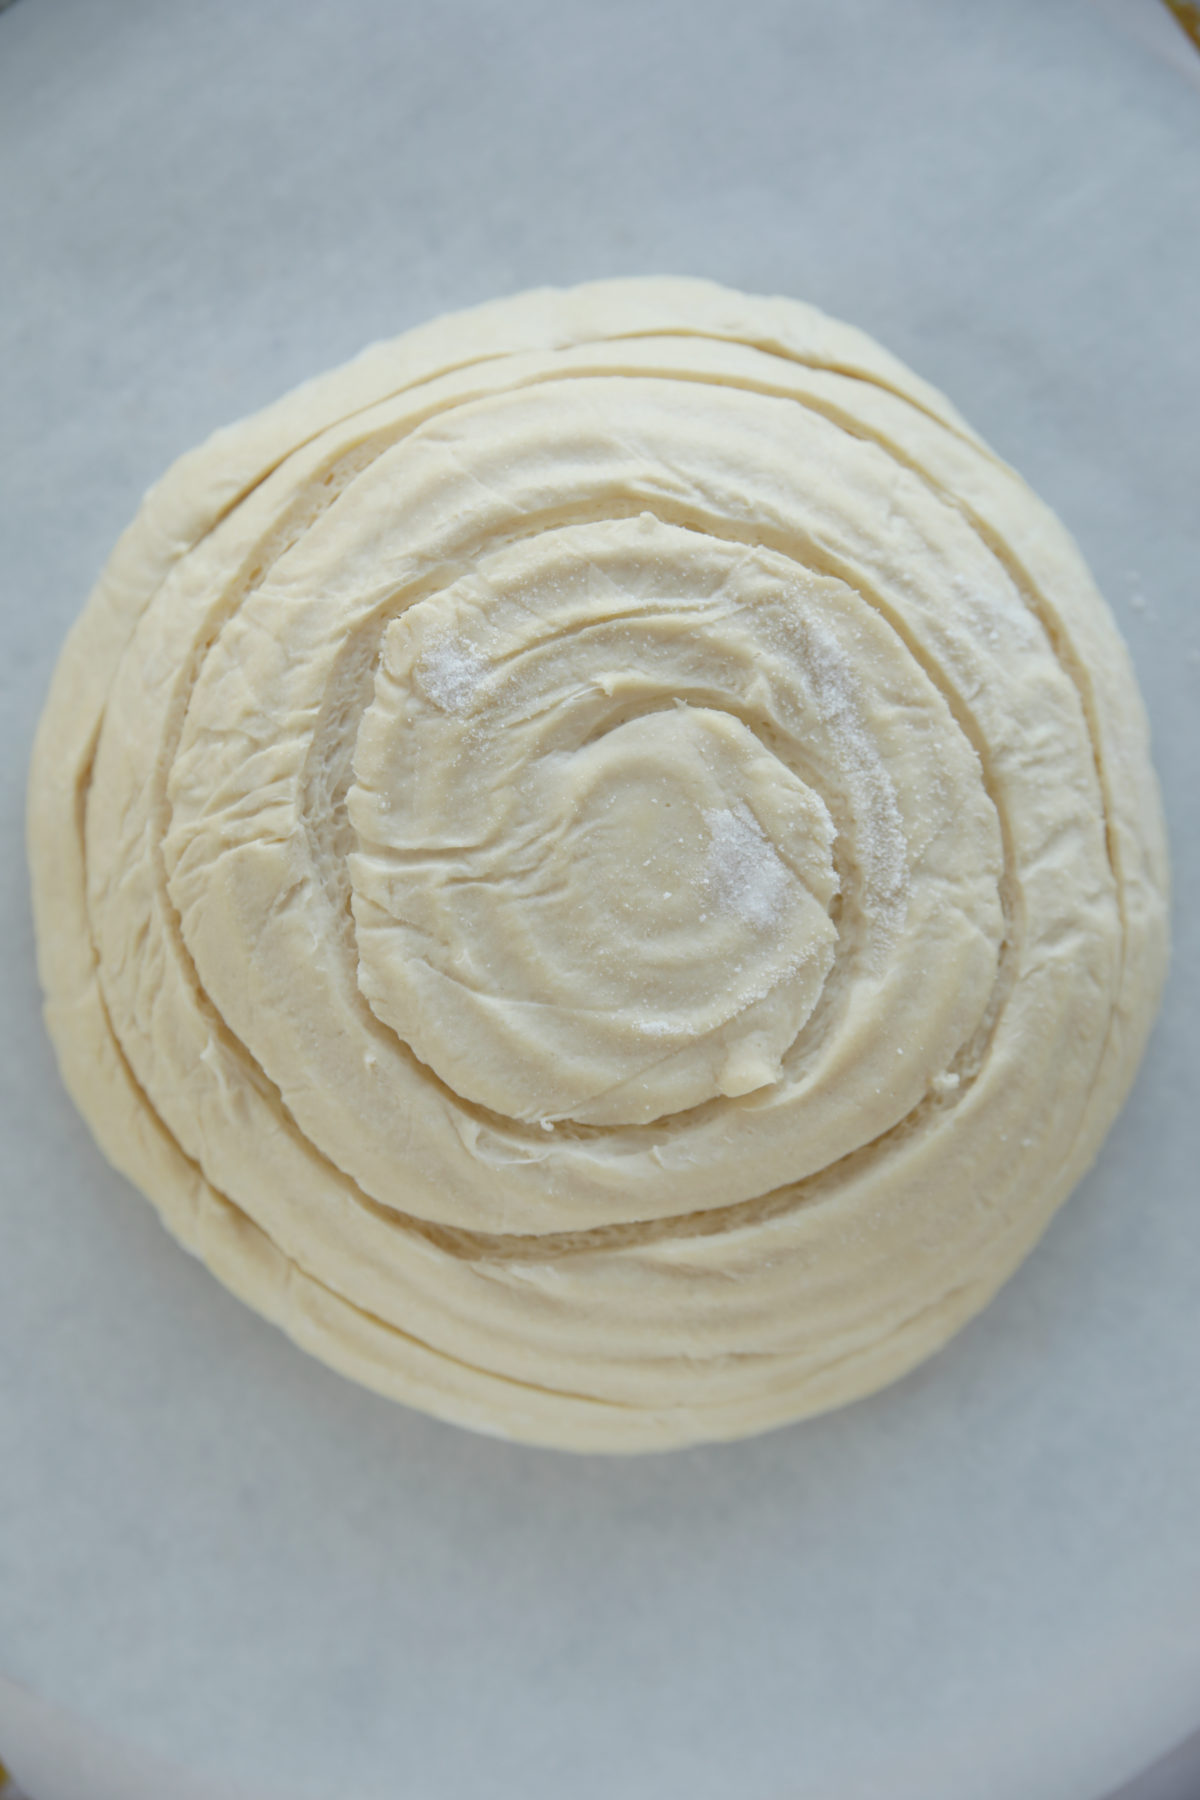
Best for: Round boules. The goal is a hypnotic, spinning pattern that looks incredible in photos. My family calls it the cinnamon roll loaf shape….
- How to do it: Use a straight lame. Hold tension and start at the very center of the loaf. In one continuous motion, draw an expanding spiral outward toward the edge.
- Depth and Angle: Keep this one fairly shallow (1/4 inch) to prevent the dough from losing its structure. Cut at a 90-degree angle.
- Pro Tip: Bakers suggest using a rotating cake stand or “lazy Susan.” You spin the stand with one hand while holding the lame steady with the other. I didn’t love that method. I suggest doing it free hand initially and graduating to a lazy Susan if you want a more perfectly uniform spiral. (Beginners will find it hard to keep everything working together for a good result.)
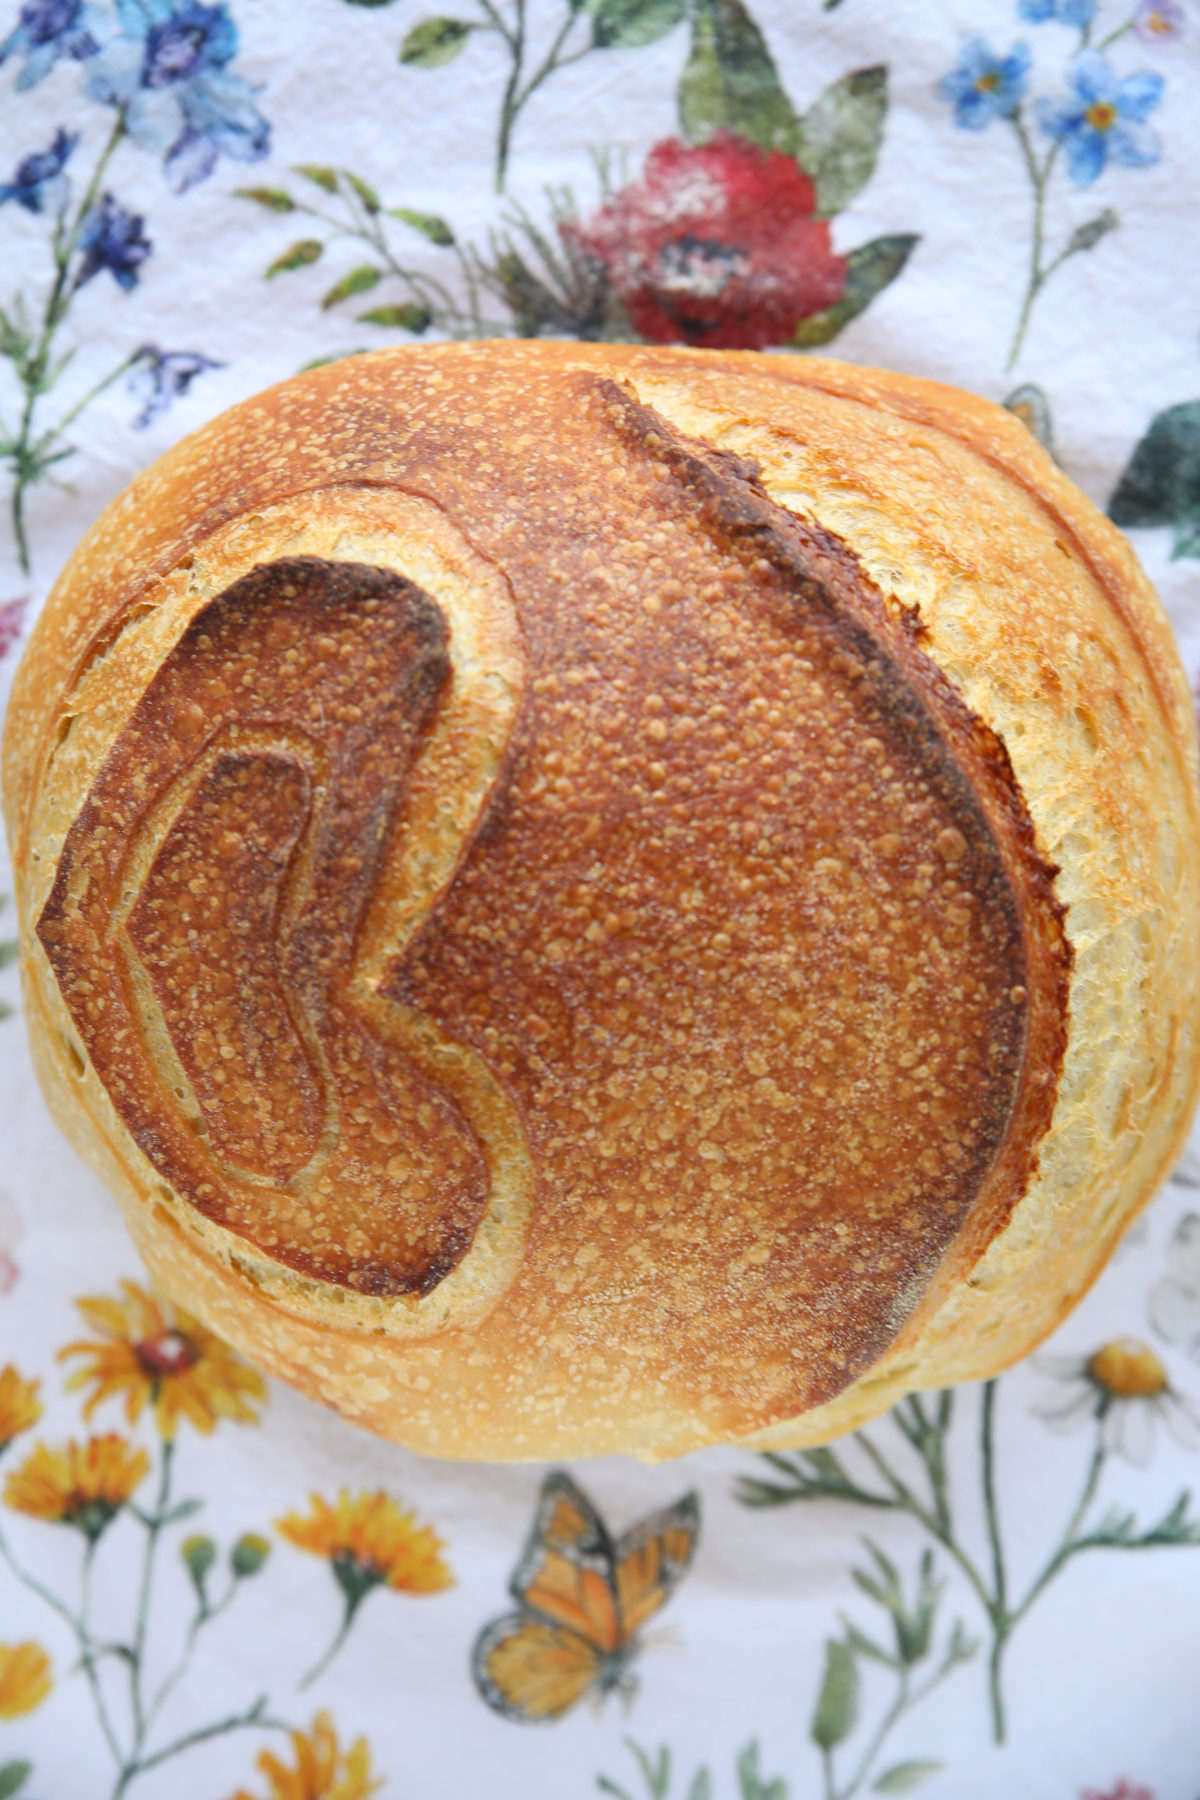
9. The Heart Shape – Round
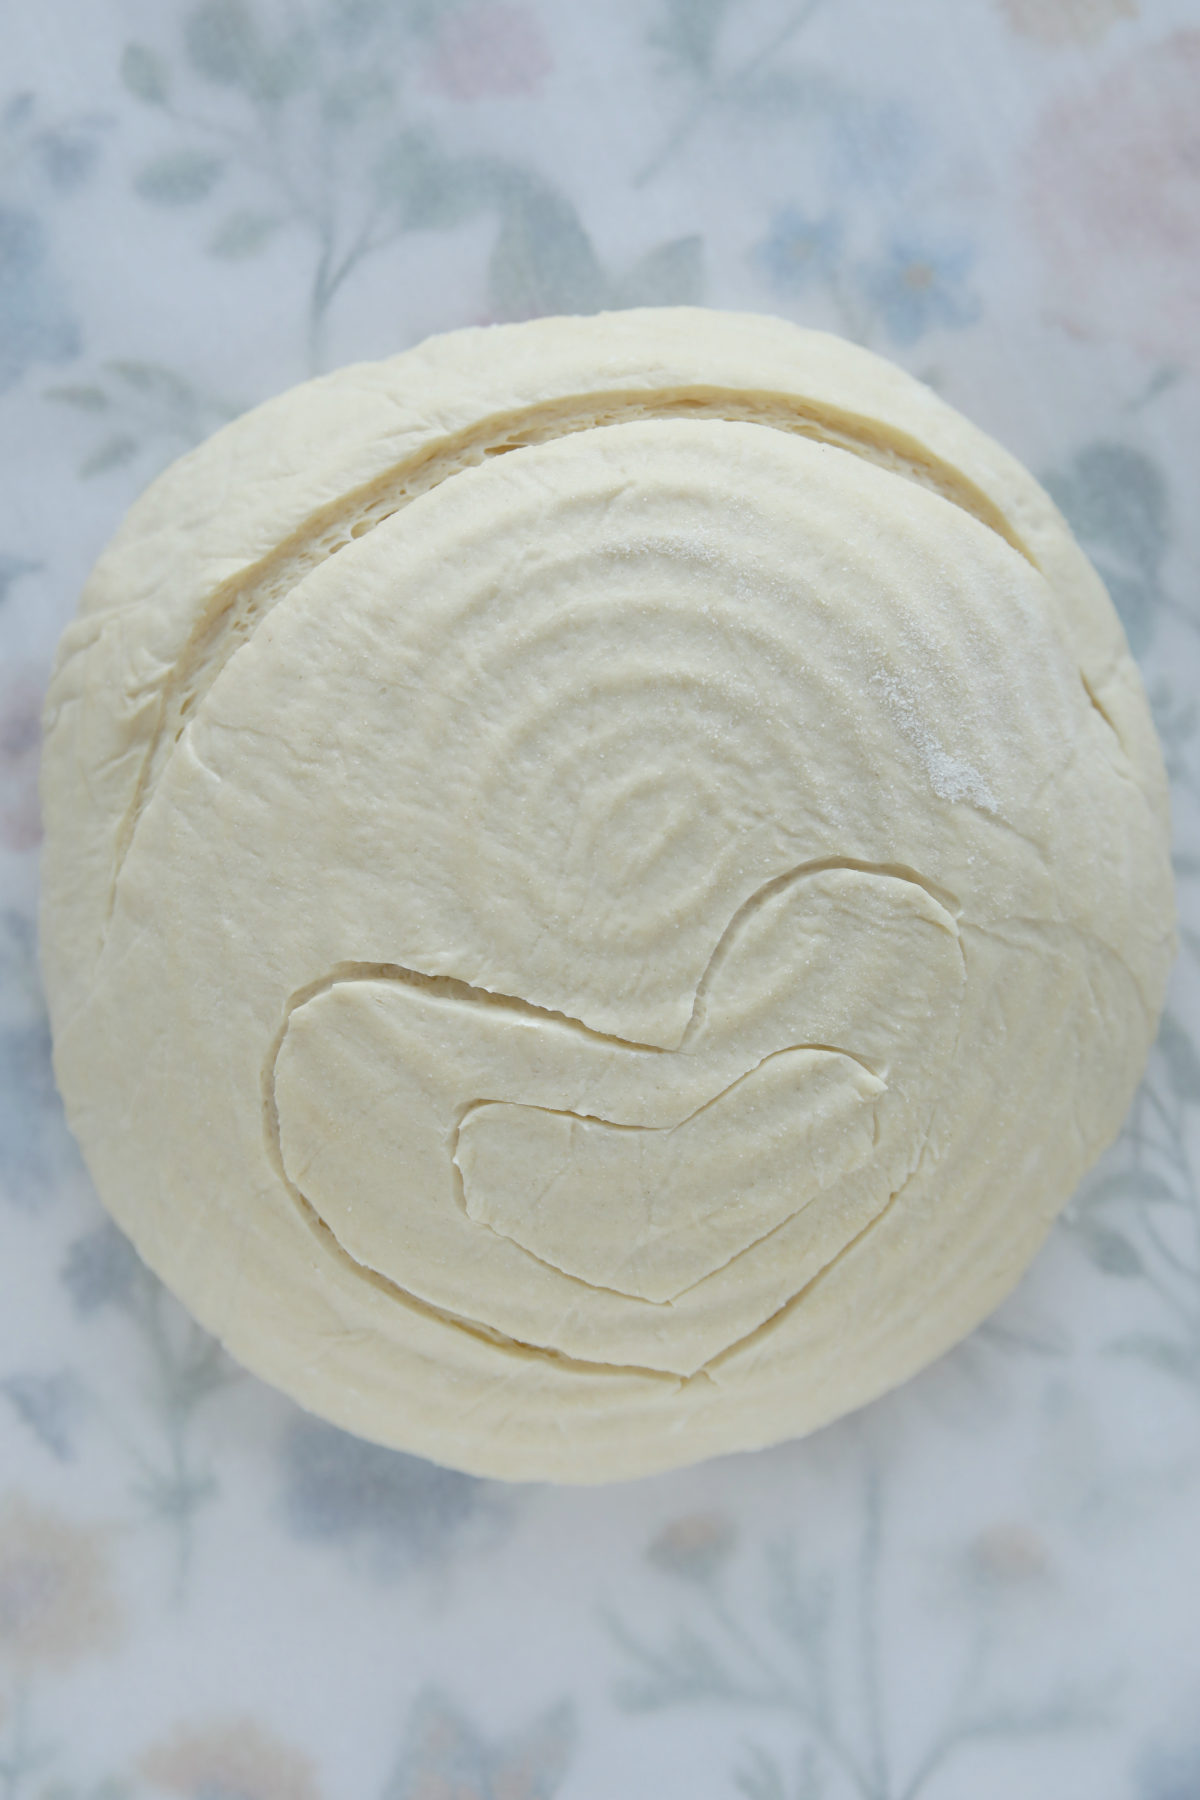
Best for: Round boules.
- How to do it: Use a straight or curved lame for the heart. (Curved is easier for me on this one.) Hold tension and score two mirrored “C” shapes that meet at a point at the bottom and curve inward at the top to form a heart. Then cut an expansion score the same way you would do a Crescent Shaped Expansion Loaf. Remember you must do some sort of expansion score with the decorative heart or the loaf will explode wherever it has a mind to.
- Depth and Angle: The heart should be scored about 1/4 inch at about a 90-degree angle.
- Pro Tip: This is a challenge because oven spring wants to push the heart apart. Use a cold loaf straight from the fridge to keep your lines precise! I felt cutesy so I went wild and did a 2nd heart inside. You can stack up as many as you want.
10. The Twinkling Star – Round
Best for: Round boules. This is one of my all time faves for a round loaf!
- How to do it: Think of this as an “X” with extra lines. Hold tension and use a straight lame. Start with your classic Cross, then add one or two diagonal slashes between each “arm” of the cross to form the sparkles. (I used one slash but you could fit in two.)
- Depth and Angle: Score the primary cross cuts at 1/2 inch deep. Score the additional “sparkle” cuts at 1/4 inch.
- Pro-Tip: Because there are so many cuts, the dough will expand in many directions.

Common Questions & Troubleshooting
What is an “ear”? An ear is the crusty, prominent ridge that forms when a flap of dough peels back during baking. Historically, it was a sign of a well-fermented, expertly scored loaf. If you are having a little trouble figuring out why somebody would care you are not alone. I find this desire humorous but we all have different things we love! And I still felt proud the first time a friend said, “nice ear!”
Scoring vs. Scouring: While some people search for “scouring sourdough bread,” the correct baking term is “scoring.” Scouring is for cleaning pans; scoring is for beautiful bread! I’m the world’s worst speller so I totally didn’t learn this by trial and error 😉
The Dragging Blade: If your blade is pulling the dough, it’s either a dull blade or your dough is over-proofed and has lost its tension. My top suggestion is to try rotating or changing your blade. If your scoring is still on the struggle bus try focusing on nailing your dough proofing.
The “No-Show” Score: If your pattern disappeared, you likely didn’t score deep enough, or your oven didn’t have enough steam to keep the crust soft while it expanded.
A Tight Band Inside the Bread: Did you cut open your loaf and see a right band maybe 1/2 inch give or take around the dome of the loaf? Been there! Make sure you are scoring deeply enough. Nailing that score is likely to fix this one right up!
New to sourdough? Start Here! How To Feed Sourdough Starter Beginners Guide Easy Sourdough Bread Recipe for Beginners (Artisan Loaf)
What’s Your Favorite Simple Sourdough Scoring Pattern?
I would love to hear what your favorite beginning scoring pattern is! One of these or some other pattern please hop in the comments and share. I’m always excited to see what other bakers are enjoying. Have fun scoring those loaves!
P.S. All of this bread was made with my Easy Sourdough Bread For Beginners Recipe.
Leave a Reply